Make sure this part fits

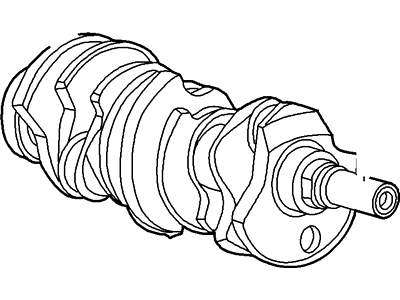
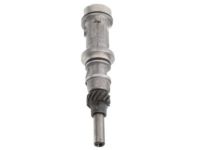
Ford F7DZ-6303-AA Crankshaft Assembly

1997-2012 Ford F7DZ6303AA

Customer Questions & Expert Answers (4)
Ford F7DZ-6303-AA Crankshaft Assembly
  • Part Description
    Crankshaft Assy
  • Base No.
    6303
  • Manufacturer
    Ford
Make sure this part fits
$272.33 MSRP: $401.67
You Save: $129.34 (33%)
Ships in 1-3 Business Days
1
ADD TO CART
  • Related Parts
  • Product Specifications
  • Vehicle Fitment
  • Customer Questions & Expert Answers
  • Product Specifications

    BrandGenuine Ford
    Base No.6303
    Manufacturer Part NumberF7DZ-6303-AA, F7DZ6303AA
    Part DescriptionCrankshaft Assy
    Other NamesCrankshaft
    Item Dimensions9.0 x 7.8 x 21.4 inches
    Item Weight43.10 Pounds
    ConditionNew
    Fitment TypeDirect Replacement
    ManufacturerFord
    SKUF7DZ-6303-AA
    WarrantyThis genuine Ford part is guaranteed by Ford's factory warranty.
    Shipping & ReturnShipping Policy Return Policy
    Warning: California’s Proposition 65
  • Vehicle Fitment

    Year Make Model Engine Important vehicle option details
    2009-2012, 2001-2002 Ford Escape6 Cyl 3.0L DOHC EFI Modular, 6 Cyl 3.0L OHC Duratec4AT CD4E, 5-Speed Manual Transmission, 5-Speed Manual Transmission - AK, 6-Speed Automatic Transmission 6F Mid-Range, CVT Auto Trans Powersplit Elec, Four-Wheel Drive (Full Time) (Left Hand Drive), Four-Wheel Drive (Right Hand Drive), Front-Wheel Drive (Left Hand Drive), Left Hand Drive, Two-Wheel Drive (Left Hand Drive), Two-Wheel Drive (Right Hand Drive)
    2010-2012 Ford Fusion6 Cyl 3.0L OHC Duratec5-Speed Automatic Transmission Mazda FNR5, 5-Speed Manual Transmission (G5M), 6-Speed Automatic Transaxle - AWF21, 6-Speed Automatic Transmission 6F Mid-Range, 6-Speed Manual Transmission Mazda G6M, CVT Auto Trans Powersplit Elec, Four-Wheel Drive (Full Time) (Left Hand Drive), Front-Wheel Drive (Left Hand Drive), Left Hand Drive
    1997-2005 Ford Taurus6 Cyl 3.0L4AT 4F50N, 4AT AX4N, 4AT AX4S
    2000-2006 Lincoln LS6 Cyl 3.0L DOHC EFI Modular5-Speed Automatic Transmission 5R55S, 5-Speed Automatic Transmission NAAO 5R55N, 5-Speed Manual Transmission Getrag-221, Left Hand Drive, Rear-Wheel Drive (Left Hand Drive), Rear-Wheel Drive (Right Hand Drive)
    2010-2012 Lincoln MKZ6 Cyl 3.0L OHC Duratec5-Speed Automatic Transmission Mazda FNR5, 5-Speed Manual Transmission (G5M), 6-Speed Automatic Transaxle - AWF21, 6-Speed Automatic Transmission 6F Mid-Range, 6-Speed Manual Transmission Mazda G6M, CVT Auto Trans Powersplit Elec, Four-Wheel Drive (Full Time) (Left Hand Drive), Front-Wheel Drive (Left Hand Drive), Left Hand Drive
    2009-2011 Mercury Mariner6 Cyl 3.0L OHC Duratec4AT CD4E, 5-Speed Manual Transmission - AK, 6-Speed Automatic Transmission 6F Mid-Range, CVT Auto Trans Powersplit Elec, Four-Wheel Drive (Full Time) (Left Hand Drive), Front-Wheel Drive (Left Hand Drive), Left Hand Drive
    2010-2011 Mercury Milan6 Cyl 3.0L OHC Duratec5-Speed Automatic Transmission Mazda FNR5, 5-Speed Manual Transmission (G5M), 6-Speed Automatic Transaxle - AWF21, 6-Speed Automatic Transmission 6F Mid-Range, 6-Speed Manual Transmission Mazda G6M, CVT Auto Trans Powersplit Elec, Four-Wheel Drive (Full Time) (Left Hand Drive), Front-Wheel Drive (Left Hand Drive), Left Hand Drive
    1997-2005 Mercury Sable6 Cyl 3.0L4AT 4F50N, 4AT AX4N, 4AT AX4S, 6AT
  • Customer Questions & Expert Answers

    Q:
    Is the the correct part for the attached VIN? Posted by FordPartsGiant Specialist
    A:
    You can Select Your Vehicle to check if F7DZ-6303-AA fits your vehicle.
    Posted by FordPartsGiant Specialist
    Q:
    How is the crankshaft removed and installed on Mercury Mariner? Posted by Customer
    A:
    The crankshaft can only be removed after the engine is pulled out of the car, under condition that the flywheel, crankshaft pulley, timing belt, oil pan, oil pump body, oil filter, and piston/connecting rod assemblies have been removed. To check the crankshaft end-float, the dial-indicator is attached to the crankshaft as shown before the removal of the crankshaft. Insert the indicating pin beneath the crankshaft, grate the indicator to the rear until it comes to zero, then grate it to the front and the reading should range from 0.003 to 0.010 inch (0.076 to 0.254 mm). If a dialindicator is not available, clearance may be checked with a feeler gauges. Ease off the main bearing cap or lower cylinder block bolts sufficiently so that they can be undone with the nut wrench and said process ought to be done in the method mentioned above. In the case of four-cylinder engines, the main bearing caps have to be unbolted; in the case of V6 engines, try to give the lower cylinder block a gentle knock with a soft-face hammer and it can be lifted off. Slowly lift out the crankshaft as it can be very heavy and is easier done with another person, then torque the main bearing caps or screw the lower cylinder block back in only hand tight. The engine block and crankshaft have to be clean and inspected when the installation is carried out. Pull off the main bearing caps, clean the bearing surface and place new upper main bearing on the engine block in a proviso that the oil holes are matching. Clean the lower main bearing inserts and fit the lower main caps. They should not be 'hammered' into place and the metal should not be lubricated at this stage. Scrape and remove sand and dirtiest from crankshaft main bearing journals and oil holes. Place the crankshaft on the main bearings and then measure the main bearing oil clearance with the help of Plastigage and do not interchange the two. The caps or the lower cylinder block should be fitted without disturbing the Plastigage and smeared the bolt threads with clean engine oil: tighten the nuts and bolts-through the sequence and without turning the crankshaft. Regrettably, having removed the caps, and attempted to measure the Plastigage width against the scale to determine oil clearance, the width of the Plastigage had doubled (from 4mm to 8mm) due to the interference of dirt or oil. In case clearance is wrong, then measure and compare bearing insert size and look for taper on the crank journal. When the layer of Plastigage has been removed clean both faces of the bearing insert and coat with a light film of grease or assembly lube before replacing the crankshaft. Remove the bearing insert from the housing and clean the faces where it will contact with lubricant leaving the oil free surface. For V6 engines use RTV for the lower cylinder block of the engine block, while for the four-cylinder engines place main bearing caps in the forward position with arrows. Use clean engine oil on threads of bolts and then screw the bolts to fit by hand then torque them in the right order. Check crankshaft end play again and turn the crankshaft to and fro with your fingers and make sure it does not bind, only spins free. Last of all, fit a new rear main oil seal.
    Posted by FordPartsGiant Specialist
    Q:
    How is the crankshaft removed and installed on Ford Escape? Posted by Customer
    A:
    The crankshaft can only be removed after the engine is pulled out of the car, under condition that the flywheel, crankshaft pulley, timing belt, oil pan, oil pump body, oil filter, and piston/connecting rod assemblies have been removed. To check the crankshaft end-float, the dial-indicator is attached to the crankshaft as shown before the removal of the crankshaft. Insert the indicating pin beneath the crankshaft, grate the indicator to the rear until it comes to zero, then grate it to the front and the reading should range from 0.003 to 0.010 inch (0.076 to 0.254 mm). If a dialindicator is not available, clearance may be checked with a feeler gauges. Ease off the main bearing cap or lower cylinder block bolts sufficiently so that they can be undone with the nut wrench and said process ought to be done in the method mentioned above. In the case of four-cylinder engines, the main bearing caps have to be unbolted; in the case of V6 engines, try to give the lower cylinder block a gentle knock with a soft-face hammer and it can be lifted off. Slowly lift out the crankshaft as it can be very heavy and is easier done with another person, then torque the main bearing caps or screw the lower cylinder block back in only hand tight. The engine block and crankshaft have to be clean and inspected when the installation is carried out. Pull off the main bearing caps, clean the bearing surface and place new upper main bearing on the engine block in a proviso that the oil holes are matching. Clean the lower main bearing inserts and fit the lower main caps. They should not be 'hammered' into place and the metal should not be lubricated at this stage. Scrape and remove sand and dirtiest from crankshaft main bearing journals and oil holes. Place the crankshaft on the main bearings and then measure the main bearing oil clearance with the help of Plastigage and do not interchange the two. The caps or the lower cylinder block should be fitted without disturbing the Plastigage and smeared the bolt threads with clean engine oil: tighten the nuts and bolts-through the sequence and without turning the crankshaft. Regrettably, having removed the caps, and attempted to measure the Plastigage width against the scale to determine oil clearance, the width of the Plastigage had doubled (from 4mm to 8mm) due to the interference of dirt or oil. In case clearance is wrong, then measure and compare bearing insert size and look for taper on the crank journal. When the layer of Plastigage has been removed clean both faces of the bearing insert and coat with a light film of grease or assembly lube before replacing the crankshaft. Remove the bearing insert from the housing and clean the faces where it will contact with lubricant leaving the oil free surface. For V6 engines use RTV for the lower cylinder block of the engine block, while for the four-cylinder engines place main bearing caps in the forward position with arrows. Use clean engine oil on threads of bolts and then screw the bolts to fit by hand then torque them in the right order. Check crankshaft end play again and turn the crankshaft to and fro with your fingers and make sure it does not bind, only spins free. Last of all, fit a new rear main oil seal.
    Posted by FordPartsGiant Specialist
    Q:
    What should you do after removing the crankshaft for the 2017 Ford Fusion? Posted by Customer
    A:
    Clean the bearing insert faces in the cylinder block, then apply a thin, uniform layer of moly-base grease or engine assembly lube to each of the bearing surfaces.
    Posted by FordPartsGiant Specialist
    See expert answers on similar Crankshaft
    If you have any questions about this product, please don't hesitate to ask us. We will be happy to help you!

Genuine Ford Part F7DZ-6303-AA, the Right Choice

To ensure reliability, purchase Ford part # F7DZ-6303-AA Crankshaft Assembly. It is sometimes referred to as Ford Crankshaft. In terms of quality and longevity, OEM parts are top-tier. This is because they are made according to Ford's demanding factory specifications and go through strict quality control. This part fits specific Ford Escape, Fusion, Taurus models. It fits Lincoln LS, MKZ. It also fits Mercury Mariner, Milan, Sable.

FordPartsGiant.com is a leading supplier of genuine Ford parts and accessories such as Ford F7DZ6303AA Crankshaft Assembly. On our platform, we provide genuine Ford parts at incredible prices while ensuring top-tier quality. Feel at ease shopping with us, knowing our parts have a hassle-free return policy and rapid delivery service. For detailed Ford parts information, click here.

Why choose Ford Parts Giant

  • Dedicated Service

    Your complete satisfaction is our #1 goal

  • Lowest Prices

    Best deals on genuine OE parts from dealerships

  • Fast Delivery

    Orders are processed and delivered promptly