Make sure this part fits

Ford FOTZ-3A131-A End Assembly - Drag Link Rod

1983-1997 Ford FOTZ3A131A

Customer Questions & Expert Answers (4)
Ford FOTZ-3A131-A End Assembly - Drag Link Rod
  • Part Description
    End Assy - Drag Link Rod
  • Base No.
    3A131
  • Position
    Passenger Side,Outer
  • Replaces
    E9TZ-3A131-F
  • Manufacturer
    Ford
  • Manufacturer's Notes
    This part is discontinued.
Make sure this part fits
$0.00Currently Unavailable

Due to manufacturer supply shortage, this item isn't currently available for ordering.

  • Related Parts
  • Product Specifications
  • Vehicle Fitment
  • Customer Questions & Expert Answers
  • Product Specifications

    BrandGenuine Ford
    Base No.3A131
    Manufacturer Part NumberFOTZ-3A131-A, FOTZ3A131A
    Part DescriptionEnd Assy - Drag Link Rod
    Other NamesOuter Tie Rod, Tie Rod End
    Item Dimensions1.8 x 3.5 x 6.7 inches
    Item Weight2.00 Pounds
    PositionPassenger Side,Outer
    ConditionNew
    Fitment TypeDirect Replacement
    ReplacesE9TZ-3A131-F
    ManufacturerFord
    SKUFOTZ-3A131-A
    WarrantyThis genuine Ford part is guaranteed by Ford's factory warranty.
    Shipping & ReturnShipping Policy Return Policy
    Warning: California's Proposition 65
  • Vehicle Fitment

    Year Make Model Engine Important vehicle option details
    1986-1996 Ford Bronco6 Cyl 4.9L, 8 Cyl 5.0L, 8 Cyl 5.8L3AT C6, 4AT A4LD, 4AT AOD, 4AT E4OD, 4MT, 5MT
    1990 Ford Bronco II6 Cyl 2.9L4AT A4LD, 4AT AOD, 5MT
    1991-1994 Ford Explorer6 Cyl 4.0L4AT A4LD, 5MT
    1990-1997 Ford F Super Duty10 Cyl 6.8L, 8 Cyl 7.3L Diesel Turbocharged4AT 4R100, 5AT, 5MT, 6MT
    1986-1996 Ford F-1506 Cyl 3.8L, 6 Cyl 4.9L, 8 Cyl 5.0L, 8 Cyl 5.8L3AT C5, 3AT C6, 3MT, 4AT 4R70W, 4AT 4R75W, 4AT AOD, 4AT E4OD, 4MT, 5MT
    1986-1996 Ford F-2506 Cyl 4.9L, 8 Cyl 4.9L, 8 Cyl 5.0L, 8 Cyl 5.8L, 8 Cyl 6.9L, 8 Cyl 7.3L, 8 Cyl 7.5L3AT C6, 3MT, 4AT AOD, 4AT E4OD, 4MT, 5MT
    1986-1997 Ford F-3506 Cyl 4.9L, 8 Cyl 5.0L, 8 Cyl 5.8L, 8 Cyl 6.9L, 8 Cyl 7.3L, 8 Cyl 7.5L3AT C6, 4AT AOD, 4AT E4OD, 4MT, 5MT
    1990-1997, 1983-1988 Ford Ranger4 Cyl 2.0L, 4 Cyl 2.2L, 4 Cyl 2.3L, 6 Cyl 2.8L, 6 Cyl 2.9L, 6 Cyl 3.0L, 6 Cyl 4.0L3AT C3, 3AT C5, 4AT 4R44E, 4AT 4R55E, 4AT A4LD, 4MT, 5AT 5R55E, 5MT
  • Customer Questions & Expert Answers

    Q:
    Is the the correct part for the attached VIN? Posted by FordPartsGiant Specialist
    A:
    You can Select Your Vehicle to check if FOTZ-3A131-A fits your vehicle.
    Posted by FordPartsGiant Specialist
    Q:
    How to remove and install the pitman arm, tie rod, tie rod ends, and drag link on Ford Bronco II? Posted by Customer
    A:
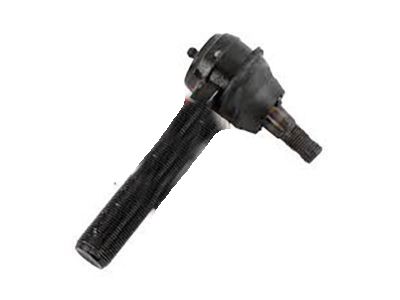
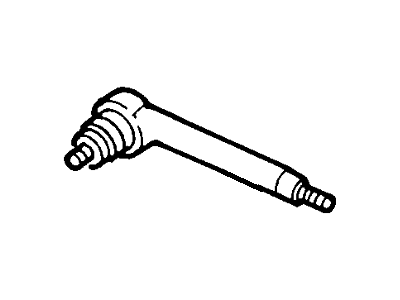
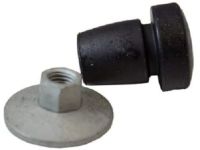
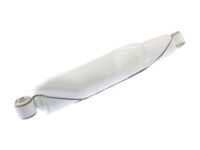
    To remove the pitman arm, raise and safely support the vehicle using jack stands, then remove the cotter pin and nut from the drag link ball stud at the pitman arm. Utilize a pitman arm removal tool to detach the drag link ball stud from the pitman arm, followed by removing the retaining nut and washer to take off the pitman arm from the steering gear sector shaft. For installation, reverse the removal steps, ensuring to torque the pitman arm attaching washer and nut to 170-230 ft. lbs., the drag link ball stud nut to 50-70 ft. lbs., and install a new cotter pin. Check and adjust front end alignment as necessary. For the tie rod, raise and support the vehicle, ensuring the front wheels are straight ahead, then remove the nut and cotter pin from the ball stud on the drag link and detach the ball stud using the same removal tool. Loosen the bolts on the tie rod adjusting sleeve, counting the turns to remove the tie rod. When installing, replace the tie rod in the sleeve with the same number of turns, torque the adjusting sleeve nuts to 30-42 ft. lbs., ensure the adjusting sleeve clamps are pointed down at a 45 angle, tighten the tie rod ball stud to drag link retaining bolt to 50-75 ft. lbs., and install a new cotter pin. Again, check and adjust front end alignment as needed. For tie rod ends, raise and support the vehicle, ensuring the front wheels are straight ahead, then remove the nut and cotter pin from the ball stud on the drag link and detach the ball stud. Loosen the bolts on the tie rod adjusting sleeve, counting the turns to remove it. For installation, place the adjusting sleeve on the tie rod ball stud with the same number of turns, loosely assemble the ball stud in the spindle arm, torque the retaining nuts to 30-42 ft. lbs., ensure the adjusting sleeve clamps are pointed down at a 45 degrees angle, and torque the nut to 50-75 ft. lbs. before installing a new cotter pin. Check and adjust front end alignment as required. For the drag link, raise and support the vehicle, ensuring the front wheels are straight ahead, then remove the nuts and cotter pins from the ball studs at the pitman arm and steering tie rod, detaching the ball studs using the removal tool. Loosen the bolts on the drag link adjusting sleeve, counting the turns to remove it. When installing, replace the drag link with the same number of turns, tighten the adjusting sleeve nuts to 30-42 ft. lbs., ensure the adjusting sleeve clamps are pointed down at a 45 degrees angle, position the drag link ball stud in the pitman arm and the steering tie rod ball stud in the drag link, and torque the nuts to 50-75 ft. lbs. before installing a new cotter pin. Finally, check and adjust front end alignment as necessary.
    Posted by FordPartsGiant Specialist
    Q:
    How to remove and install the tie-rod end on Ford Explorer? Posted by Customer
    A:
    To remove the front wheel, first loosen the lug nuts on the side to be dismantled, then raise the vehicle and support it securely on jackstands. If the vehicle has Automatic Ride Control, ensure the air suspension switch is turned off before raising the vehicle to avoid damage. Next, remove the front wheel, then take out the cotter pin and loosen the nut on the tie-rod end stud, discarding the cotter pin afterward. Use a Pitman arm puller to disconnect the tie-rod from the steering spindle, ensuring to back off the nut without removing it and using a small puller to force the ballstud out. For models from 1994 and earlier, loosen the clamp bolts on the tie-rod adjusting sleeve; for 1995 and later models, loosen the tie-rod end jam nut and back it off several turns. Mark the threads adjacent to the adjusting sleeve or tie-rod end, then unscrew the tie-rod end from the adjusting sleeve or connecting rod. For installation, insert the tie-rod end into the adjusting sleeve or connecting rod, threading it in until the marks align. Attach the tie-rod onto the steering spindle, ensuring the front wheels and steering wheel are straight and the tie-rod stud is seated properly to prevent rotation while tightening the nut. Install a new nut on the stud and tighten it to the specified torque, then add a new cotter pin and bend the ends over completely. Tighten the tie-rod adjusting sleeve clamp bolts or jam nut to the specified torque, ensuring the tie-rod is positioned as it was originally. Finally, install the wheel and lug nuts, lower the vehicle, and tighten the lug nuts to the specified torque, followed by having the front-end alignment checked by a dealer service department or an alignment shop.
    Posted by FordPartsGiant Specialist
    Q:
    How to remove and install a tie-rod on 1993-2011 Ford Ranger? Posted by Customer
    A:
    To remove the tie-rod, first loosen the front wheel lug nuts on the side to be dismantled, then raise the front of the vehicle and support it securely on jackstands while blocking the rear wheels and setting the parking brake. Next, remove the front wheel, then take out the cotter pin and loosen the nut on the tie-rod end stud, discarding the cotter pin. For models from 1993 to 1997, loosen the clamp bolts on the tie-rod adjusting sleeve; for 1998 and later models, loosen the tie-rod end jam nut and back it off several turns while holding the tie-rod with locking pliers. Disconnect the tie-rod from the steering spindle using a Pitman arm puller, noting that on 1993 through 1997 4WD models, the tie-rod end is inserted from the top of the spindle, while on 2WD models, it is inserted from the bottom. For 1993 through 1997 models, unscrew the tie-rod end from the adjusting sleeve, counting and recording the number of turns it takes to back it off. For 1998 and later models, if installing a new tie-rod end, count and record the turns; if reusing the same tie-rod end, apply a paint mark on the threads adjacent to it before unscrewing. For installation, on 1993 through 1997 models, install the tie-rod end into the adjusting sleeve the same number of turns noted during removal, while for 1998 and later models, screw the old tie-rod end into the connecting rod until adjacent to the paint mark or install a new tie-rod end using the same number of turns noted. Install the tie-rod onto the steering spindle, ensuring the front wheels and steering wheel are straight and the tie-rod stud is seated in the taper to prevent rotation while tightening the nut. Install a new nut on the stud and tighten it to the specified torque, then install a new cotter pin and bend the ends over completely. For 1993 through 1997 models, tighten the clamp bolts on the tie-rod adjusting sleeve to the specified torque, ensuring the tie-rod is positioned correctly as it was during removal; for 1998 and later models, securely tighten the jam nut. Finally, install the wheel and lug nuts, lower the vehicle, and tighten the lug nuts to the specified torque, followed by having the front end alignment checked by a dealership service department or an alignment shop.
    Posted by FordPartsGiant Specialist
    If you have any questions about this product, please don't hesitate to ask us. We will be happy to help you!

Genuine Ford Part FOTZ-3A131-A, the Right Choice

To ensure reliability, purchase Ford part # FOTZ-3A131-A End Assembly - Drag Link Rod. It is sometimes referred to as Ford Tie Rod End. In terms of quality and longevity, OEM parts are top-tier. This is because they are made according to Ford's demanding factory specifications and go through strict quality control. This part fits specific Ford Bronco, F-150, Ranger models.

FordPartsGiant.com is a leading supplier of genuine Ford parts and accessories such as Ford FOTZ3A131A End Assembly - Drag Link Rod. On our platform, we provide genuine Ford parts at incredible prices while ensuring top-tier quality. Feel at ease shopping with us, knowing our parts have a hassle-free return policy and rapid delivery service. For detailed Ford parts information, click here.

Why choose Ford Parts Giant

  • Dedicated Service

    Your complete satisfaction is our #1 goal

  • Lowest Prices

    Best deals on genuine OE parts from dealerships

  • Fast Delivery

    Orders are processed and delivered promptly