Make sure this part fits

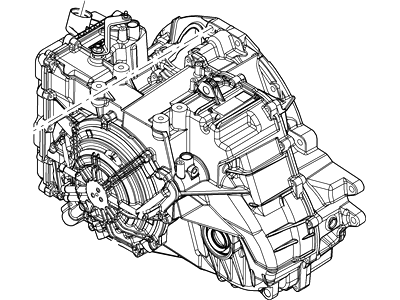
Lincoln 7T4Z-7000-BRM Automatic Transmission Assembly

2007 Lincoln MKX 7T4Z7000BRM

Customer Questions & Expert Answers (7)
Ford 7T4Z-7000-BRM Automatic Transmission Assembly
  • Part Description
    Automatic Transmission Assy
  • Base No.
    7000
  • Replaces
    7T4Z-7000-J
  • Manufacturer
    Ford
Make sure this part fits
$3715.88 MSRP: $4398.67
You Save: $682.79 (16%)
Core Charge: $1000.00
Ships in 1-3 Business Days
1
ADD TO CART
  • Related Parts
  • Product Specifications
  • Vehicle Fitment
  • Customer Questions & Expert Answers
  • Product Specifications

    BrandGenuine Lincoln
    Base No.7000
    Manufacturer Part Number7T4Z-7000-BRM, 7T4Z7000BRM
    Part DescriptionAutomatic Transmission Assy
    Other NamesTransaxle
    Item Weight204.00 Pounds
    ConditionNew
    Fitment TypeDirect Replacement
    Replaces7T4Z-7000-J
    ManufacturerFord
    SKU7T4Z-7000-BRM
    WarrantyThis genuine Ford part is guaranteed by Ford's factory warranty.
    Shipping & ReturnShipping Policy Return Policy
    Warning: California’s Proposition 65
  • Vehicle Fitment

    Year Make Model Engine Important vehicle option details
    2007 Lincoln MKX6 Cyl 3.5L DOHC VCT SMPI6-Speed Automatic Transmission 6F50, Front-Wheel Drive (Left Hand Drive), Left Hand Drive
  • Customer Questions & Expert Answers

    Q:
    Does the PN fit my vehicle? Posted by FordPartsGiant Specialist
    A:
    You can Select Your Vehicle to check if 7T4Z-7000-BRM fits your vehicle.
    Posted by FordPartsGiant Specialist
    Q:
    How to remove and install the Automatic transaxle on Ford Taurus? Posted by Customer
    A:
    Loosen the front wheel lug nuts, then place the vehicle on a hoist or raise and support the front on jackstands before removing the wheels. Have an assistant depress the brake pedal and loosen the driveaxle/hub nuts. Drain the transaxle fluid into a suitable container for recycling and drain the cooling system. Remove the battery and battery tray, followed by the air filter housing and duct, then the housing bracket bolts and bracket, and the throttle body intake hose. Disconnect the shift cable from the shift lever and housing from the bracket, and if possible, remove the bracket from the transaxle with the cable attached. For 2007 and earlier models, remove the wiper arms and wiper cowl panel, the upper engine torque rod bracket, and on non-CVT vehicles, disconnect the Transaxle Control Module harness electrical connector at the transmission range sensor. Disconnect the ground straps and remove the bolts holding the electrical harness to the transaxle, unbolt the auxiliary electric coolant pump on CVT vehicles without disconnecting the coolant hoses, and remove the upper engine torque rod mount from the engine. Remove the PCV hose, disconnect the throttle body vacuum lines, and remove the bolt securing the power steering hose bracket to the engine. Remove the starter, disconnect the large ground cable from the transaxle, and for CVT vehicles, disconnect the transaxle connector at the firewall and the harness from the transaxle. Remove the four upper transaxle bolts, the driveaxles, disconnect the oxygen sensor connectors, and remove the exhaust y-pipe. Remove the knock sensor(s) and the knock sensor harness from the transaxle. Attach an engine support fixture to the lifting hook at the transaxle end of the engine, disconnect the charcoal canister purge valve lines, and disconnect any power steering hose brackets from the transaxle or subframe. Drain the cooling system, disconnect the lower radiator hose, and secure it out of the way. Remove the steering gear-to-subframe mounting bolts and secure the steering gear to the vehicle body, then remove the left and right inner fender liners and disconnect all electrical harnesses from the subframe. Remove the right and left motor mount nuts from the subframe, the transaxle torque rod bracket from the transaxle, and the transaxle mount subframe bolts. Disconnect the stabilizer bar end links from the struts and the lower control arm ball joints from the steering knuckle. Support the subframe with two floor jacks, remove the subframe brackets and mounting bolts, and slowly lower the subframe while checking for any harnesses, hoses, or components still attached, disconnecting them as necessary before removing the subframe from the vehicle. Remove the two upper bolts and bracket bolts to take out the catalytic converter, then remove the torque converter access cover retainers and the cover. Mark the relationship of the torque converter to the driveplate, remove the converter mounting nuts, and disconnect the transaxle cooling lines from the transaxle and remove the cooling line bracket. Support the transaxle with a jack, preferably a transmission jack, and remove the remaining bolts securing the transaxle to the engine. Move the transaxle away from the engine to disengage it from the engine block dowel pins, carefully lower the transmission jack to the floor, and remove the transaxle, ensuring the torque converter is secure. For 2008 and later V6 models, remove the upper intake manifold, disconnect the auxiliary coolant pump bracket without disconnecting the hoses, and secure the pump out of the way. Disconnect the transaxle connector and harness retainer, remove the transaxle dipstick tube nut, and rotate the tube counterclockwise to remove it. Remove the upper transaxle-to-engine bolts, attach an engine support fixture, remove the front wheels, inner fender liners, and splash shield, detach the power steering line retainers from the subframe, and remove the left and right half-shafts. Disconnect the oxygen sensor connectors and harnesses, remove the bolts attaching the steering gear to the subframe, and secure it to the vehicle. Remove the stabilizer bar brackets from the subframe, disconnect the torque rod bracket from the transaxle, and for AWD models, remove the transfer case. Disconnect the lower control arm ball joints from the steering knuckles, support the subframe using two floor jacks, and remove the subframe brackets and mounting bolts. Slowly lower the subframe, checking for any harnesses, hoses, or components still attached, and remove the subframe from the vehicle. Remove the torque converter access cover by removing the two retainers, mark the relationship of the torque converter to the driveplate, and remove the converter mounting bolts. Remove the transaxle cooler line covers and disconnect the cooler lines from the bypass valve. Support the transaxle with a jack, remove the transaxle mount through-bolt, lower the transaxle about 2 inches, and remove the mount bracket from the transaxle. Remove the remaining transaxle-to-engine bolts, move the transaxle away from the engine to disengage it from the engine block dowel pins, and carefully lower the transmission jack to the floor to remove the transaxle. For 2013 and later four-cylinder models, remove the transaxle cooler line-to-transaxle nuts and disconnect the lines, ensuring the cooling line seals do not get stuck in the transaxle. Remove the temperature control valve and transaxle fluid warmer mounting nuts, disconnect any harness clips from the top of the transaxle, and remove the upper transaxle-to-engine bolts. Remove the starter, then the insulator, mark the relationship of the torque converter to the driveplate, and remove the converter mounting nuts. Disconnect the torque rod bracket from the transaxle, disconnect the steering column coupler at the steering gear, remove the stabilizer bar links from the strut assemblies, and disconnect the tie-rod ends from the steering arms. Disconnect the lower control arm ball joints from the steering knuckle, support the subframe using a pair of floor jacks, and remove the subframe brackets and mounting bolts. Slowly lower the subframe, checking for any harnesses, hoses, or components still attached, and remove the subframe from the vehicle. Remove the driveaxles, disconnect any brackets securing the transaxle cooling lines, and remove the catalytic converter bracket nuts. Support the transaxle with a jack, remove the transaxle mount through-bolt, and then remove the mount bracket from the transaxle. Remove the remaining transaxle-to-engine bolts, move the transaxle away from the engine to disengage it from the engine block dowel pins, and carefully lower the transmission jack to the floor to remove the transaxle, ensuring the torque converter is secure. For installation, follow the reverse of removal, ensuring the torque converter engages properly with the automatic transaxle fluid pump inner gear, aligning the matchmarks made on the torque converter and driveplate, installing all driveplate-to-torque converter nuts before tightening, and tightening all specified bolts to the correct torque. Fill the transaxle with the correct type and amount of automatic transmission fluid and adjust the shift cable as necessary.
    Posted by FordPartsGiant Specialist
    Q:
    How do you remove and install Automatic Transmission on Lincoln MKX? Posted by Customer
    A:
    To remove the components, start by disconnecting the cables from the battery and removing the battery and tray. Drain the cooling system and remove the radiator hoses, followed by the charge air cooler pipes on turbocharged models. Next, take out the air filter housing and duct, then remove the housing bracket bolts and bracket. Loosen the hose clamp and detach the duct or pipe to the throttle body. For 2010 and earlier models, remove the nut securing the transaxle fill tube, rotate it counterclockwise, and pull it from the transaxle if equipped. Disconnect the Transaxle Control Module harness electrical connector at the transmission range sensor, along with the ground straps and bolts holding the electrical harness to the transaxle. Detach the shift cable from the transaxle shift control arm and remove the bolts securing the transaxle cable mount. Remove the transaxle front and rear wire harness brackets, then disconnect the electrical connectors for the Vehicle Speed Sensor and TCM. Attach an engine support fixture to the lifting hook at the transaxle end of the engine, or use a bolt to secure the support fixture chain to a hole at the end of the cylinder head. For 2010 and earlier V6 engines, remove the upper intake manifold first. Remove the four upper engine-to-transmission mounting bolts, loosen the driveaxle/hub nuts and wheel lug nuts, raise the front of the vehicle, and support it securely on jackstands or a lift before removing the wheels. Disconnect the shift cable from the transaxle and remove the bolts securing the shift cable brackets. Unbolt the power steering hose bracket and retainers if equipped, then disconnect the flexible exhaust pipe sections and the Y-pipe, removing the right-side exhaust heat shield and catalytic converter. Remove the heat shield over the roll restrictor and unbolt it, then remove the driveaxles. Take off the splash shields from the left and right fenderwells, place a block of wood above the lower control arm to protect the outer CV joint on the left side, and remove the left steering knuckle. Remove the starter, and for AWD models, take out the rear driveshaft and wire it aside. Drain the transaxle lubricant, disconnect and plug the transmission fluid hoses, and for 2019 models, remove the transaxle fluid warmer and its bracket fasteners to access the top transaxle bolts. Remove the bolts securing the transaxle support insulator brackets, then take off the brackets. If working on an AWD model, remove the transfer case. Support the subframe and remove the subframe-to-lower bumper nuts from each side, followed by the stabilizer bar-to-subframe bolts and steering gear-to-subframe bolts. Remove the subframe support brackets bolts and brackets, then take out the front suspension subframe. Support the transaxle with a jack, preferably a transmission jack, and use safety chains to steady it. Disconnect the oxygen sensors, remove the torque converter cover, and mark the relationship of the torque converter to the driveplate before removing the converter mounting nuts through the starter opening. Remove the remaining bolts securing the transaxle to the engine, then move the transaxle away from the engine to disengage it from the engine block dowel pins, carefully lowering the transmission jack to the floor to remove the transaxle. For installation, reverse the removal steps while ensuring that the drive tangs at the center of the torque converter hub engage with the recesses in the automatic transaxle fluid pump inner gear. Confirm engagement by turning the torque converter while pushing it towards the transaxle. Ensure the matchmarks made on the torque converter and driveplate line up, install all driveplate-to-torque converter nuts before tightening, and tighten them to the specified torque. Tighten the transaxle mounting bolts and suspension crossmember mounting bolts to the specified torque values, as well as the driveaxle/hub nuts and wheel lug nuts. Fill the transaxle with the correct type and amount of automatic transmission fluid, and adjust the shift cable upon completion.
    Posted by FordPartsGiant Specialist
    Q:
    Should a faulty transaxle be removed before diagnosis for the 2011 Lincoln MKX? Posted by Customer
    A:
    No, a faulty transaxle should not be removed before the vehicle has been diagnosed by a knowledgeable technician equipped with the proper tools.
    Posted by FordPartsGiant Specialist
    Q:
    What should be established before repair work can be contemplated in the event of a problem for the 2011 Ford Taurus? Posted by Customer
    A:
    It is necessary to establish whether the fault is electrical, mechanical, or hydraulic in nature.
    Posted by FordPartsGiant Specialist
    Q:
    What additional step is required for the 2008 Ford Edge? Posted by Customer
    A:
    Remove all the charge air cooler pipes.
    Posted by FordPartsGiant Specialist
    See expert answers on similar Transmission Assembly
    Q:
    Is diagnosing the transaxle problem within the scope of the manual for the 2012 Ford Edge? Posted by Customer
    A:
    No, diagnosing the transaxle problem is deemed to be beyond the scope of this manual.
    Posted by FordPartsGiant Specialist
    If you have any questions about this product, please don't hesitate to ask us. We will be happy to help you!

Genuine Ford Part 7T4Z-7000-BRM, the Right Choice

To ensure reliability, purchase Ford part # 7T4Z-7000-BRM Automatic Transmission Assembly. It is sometimes referred to as Lincoln Transmission Assembly. In terms of quality and longevity, OEM parts are top-tier. This is because they are made according to Ford's demanding factory specifications and go through strict quality control. This part fits specific Lincoln MKX models.

FordPartsGiant.com is a leading supplier of genuine Ford parts and accessories such as Ford 7T4Z7000BRM Automatic Transmission Assembly. On our platform, we provide genuine Ford parts at incredible prices while ensuring top-tier quality. Feel at ease shopping with us, knowing our parts have a hassle-free return policy and rapid delivery service. For detailed Lincoln parts information, click here.

Why choose Ford Parts Giant

  • Dedicated Service

    Your complete satisfaction is our #1 goal

  • Lowest Prices

    Best deals on genuine OE parts from dealerships

  • Fast Delivery

    Orders are processed and delivered promptly