Make sure this part fits

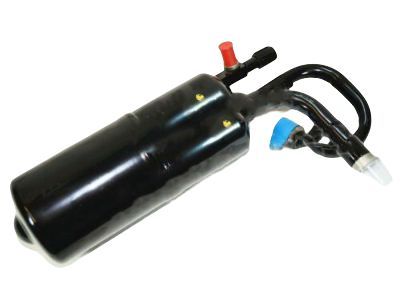
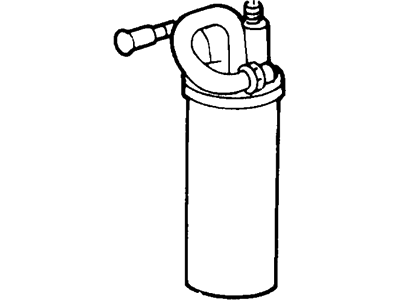
Mercury XL2Z-19C836-AC Accumulator Assy - Air Conditioning

1998-2001 Mercury Mountaineer XL2Z19C836AC

Customer Questions & Expert Answers (5)
Ford XL2Z-19C836-AC Accumulator Assy - Air Conditioning
  • Part Description
    Accumulator Assy - Air Conditioning
  • Base No.
    19C836
  • Replaces
    F87Z-19C836-AA
  • Manufacturer
    Ford
Make sure this part fits
$58.30 MSRP: $96.36
You Save: $38.06 (40%)
1
ADD TO CART
  • Related Parts
  • Product Specifications
  • Vehicle Fitment
  • Customer Questions & Expert Answers
  • Product Specifications

    BrandGenuine Mercury
    Base No.19C836
    Manufacturer Part NumberXL2Z-19C836-AC, XL2Z19C836AC
    Part DescriptionAccumulator Assy - Air Conditioning
    Other NamesDehydrator, Drier
    Item Dimensions16.8 x 4.5 x 7.8 inches
    Item Weight3.60 Pounds
    ConditionNew
    Fitment TypeDirect Replacement
    ReplacesF87Z-19C836-AA
    ManufacturerFord
    SKUXL2Z-19C836-AC
    WarrantyThis genuine Ford part is guaranteed by Ford's factory warranty.
    Shipping & ReturnShipping Policy Return Policy
    Warning: California’s Proposition 65
  • Vehicle Fitment

    Year Make Model Engine Important vehicle option details
    1998-2001 Mercury Mountaineer6 Cyl 4.0L, 8 Cyl 5.0L4AT 4R70W, 5AT 5R55E
  • Customer Questions & Expert Answers

    Q:
    Is the the correct part for the attached VIN? Posted by FordPartsGiant Specialist
    A:
    You can Select Your Vehicle to check if XL2Z-19C836-AC fits your vehicle.
    Posted by FordPartsGiant Specialist
    Q:
    How to remove and install an air conditioning accumulator on 2000-2011 Ford Ranger? Posted by Customer
    A:
    Have the air conditioning system discharged. Disconnect the negative cable from the battery. Unplug the electrical connector from the pressure switch near the top of the accumulator. Unscrew the pressure switch. Disconnect the refrigerant line from the accumulator. The accumulator is mounted on the evaporator case in the engine compartment - disconnect this quick-disconnect fitting. This requires a spring lock coupling tool of the type used for fuel injection system lines. Use a backup wrench to hold the fitting that connects the accumulator to the evaporator core, then disconnect the fitting. Plug the open fittings to prevent entry of dirt and moisture. Remove all mounting bracket fasteners, then lift the accumulator out. If a new accumulator is being installed, remove the Schrader valve and pour the oil out into a measuring cup, noting the amount. Add fresh refrigerant oil to the new accumulator equal to the amount removed from the old unit, plus one ounce. Use PAG oil for R-134a systems and mineral refrigerant oil for R-12 systems. Loosely position the new accumulator in place. Connect the accumulator to the evaporator core, using a new O-ring lubricated with clean refrigerant oil. At the same time, align the bracket with the slot between the evaporator case flanges. Using a backup wrench, tighten the fitting securely. Fully install the accumulator mounting bracket and tighten all fasteners. Install the clip that holds the evaporator inlet tube to the bracket (if equipped). Place a new O-ring, lubricated with clean refrigerant oil of the correct type, on the pressure switch nipple on the accumulator. Install the pressure switch. If it has a metal base, tighten it to the torque listed in the specifications. If it has a plastic base, tighten it by hand only. Connect the pressure switch electrical connector. Reconnect the negative cable to the battery. Take the vehicle to the shop that discharged the air conditioning system. Have the system evacuated, recharged, and tested for leaks.
    Posted by FordPartsGiant Specialist
    Q:
    How to remove and replace the air conditioning accumulator on Ford Explorer? Posted by Customer
    A:
    Have the air conditioning system discharged and recovered. Disconnect the negative cable from the battery. On 2001 and later models, remove the air intake duct, and unbolt and set aside the cruise control module. Unplug the electrical connector from the pressure switch near the top of the accumulator. Unscrew the pressure switch. On 2001 and later models, unbolt and set aside the coolant recovery/washer reservoir. Disconnect the refrigerant line from the accumulator. This requires a spring lock coupling tool of the type used for fuel injection system lines. Use a backup wrench to hold the fitting that connects the accumulator to the evaporator core, then disconnect the fitting. Plug the open fittings to prevent entry of dirt and moisture. Remove the mounting bracket screw and the screw that holds the evaporator tube to the accumulator bracket, then lift the accumulator out. If a new accumulator is being installed, remove the Schrader valve and pour the oil out into a measuring cup, noting the amount. Add fresh refrigerant oil to the new accumulator equal to the amount removed from the old unit, plus 2 ounces. Loosely position the bracket on the new accumulator. Connect the accumulator to the evaporator core, using a new O-ring lubricated with clean refrigerant oil. At the same time, align the bracket with the slot between the evaporator case flanges. Using a backup wrench, tighten the fitting securely. Install the screw that holds the bracket. Tighten the accumulator bracket and install the clip that holds the evaporator inlet tube to the bracket. Place a new O-ring, lubricated with clean refrigerant oil, on the pressure switch nipple on the accumulator. Install the pressure switch. If it has a metal base, tighten it. If it has a plastic base, tighten it by hand only. Connect the pressure switch electrical connector. Reconnect the negative cable to the battery. Take the vehicle to the shop that discharged the air conditioning system. Have the system recharged and tested for leaks.
    Posted by FordPartsGiant Specialist
    Q:
    How to remove and replace the air conditioning accumulator on Ford Explorer Sport Trac? Posted by Customer
    A:
    Have the air conditioning system discharged and recovered. Disconnect the negative cable from the battery. On 2001 and later models, remove the air intake duct, and unbolt and set aside the cruise control module. Unplug the electrical connector from the pressure switch near the top of the accumulator. Unscrew the pressure switch. On 2001 and later models, unbolt and set aside the coolant recovery/washer reservoir. Disconnect the refrigerant line from the accumulator. This requires a spring lock coupling tool of the type used for fuel injection system lines. Use a backup wrench to hold the fitting that connects the accumulator to the evaporator core, then disconnect the fitting. Plug the open fittings to prevent entry of dirt and moisture. Remove the mounting bracket screw and the screw that holds the evaporator tube to the accumulator bracket, then lift the accumulator out. If a new accumulator is being installed, remove the Schrader valve and pour the oil out into a measuring cup, noting the amount. Add fresh refrigerant oil to the new accumulator equal to the amount removed from the old unit, plus 2 ounces. Loosely position the bracket on the new accumulator. Connect the accumulator to the evaporator core, using a new O-ring lubricated with clean refrigerant oil. At the same time, align the bracket with the slot between the evaporator case flanges. Using a backup wrench, tighten the fitting securely. Install the screw that holds the bracket. Tighten the accumulator bracket and install the clip that holds the evaporator inlet tube to the bracket. Place a new O-ring, lubricated with clean refrigerant oil, on the pressure switch nipple on the accumulator. Install the pressure switch. If it has a metal base, tighten it. If it has a plastic base, tighten it by hand only. Connect the pressure switch electrical connector. Reconnect the negative cable to the battery. Take the vehicle to the shop that discharged the air conditioning system. Have the system recharged and tested for leaks.
    Posted by FordPartsGiant Specialist
    Q:
    How to remove and install an air conditioning accumulator on 1993-2011 Ford Ranger? Posted by Customer
    A:
    Have the air conditioning system discharged. Disconnect the negative cable from the battery. Unplug the electrical connector from the pressure switch near the top of the accumulator. Unscrew the pressure switch. Disconnect the refrigerant line from the accumulator. The accumulator is mounted on the evaporator case in the engine compartment-disconnect this quick-disconnect fitting. This requires a spring lock coupling tool of the type used for fuel injection system lines. Use a backup wrench to hold the fitting that connects the accumulator to the evaporator core, then disconnect the fitting. Plug the open fittings to prevent entry of dirt and moisture. Remove all mounting bracket fasteners, then lift the accumulator out. If a new accumulator is being installed, remove the Schrader valve and pour the oil out into a measuring cup, noting the amount. Add fresh refrigerant oil to the new accumulator equal to the amount removed from the old unit, plus one ounce. Caution: Use PAG oil for R-134a systems and mineral refrigerant oil for R-12 systems. Loosely position the new accumulator in place. Connect the accumulator to the evaporator core, using a new O-ring lubricated with clean refrigerant oil. At the same time, align the bracket with the slot between the evaporator case flanges. Using a backup wrench, tighten the fitting securely. Fully install the accumulator mounting bracket and tighten all fasteners. Install the clip that holds the evaporator inlet tube to the bracket (if equipped). Place a new O-ring, lubricated with clean refrigerant oil of the correct type, on the pressure switch nipple on the accumulator. Install the pressure switch. If ii has a metal base, tighten it to the torque. If it has a plastic base, tighten it by hand only. Connect the pressure switch electrical connector. Reconnect the negative cable to the battery. Take the vehicle to the shop that discharged the air conditioning system. Have the system evacuated, recharged and tested for leaks.
    Posted by FordPartsGiant Specialist
    If you have any questions about this product, please don't hesitate to ask us. We will be happy to help you!

Genuine Ford Part XL2Z-19C836-AC, the Right Choice

Your vehicle deserves only genuine OEM Ford parts and accessories. To ensure reliability, purchase Ford part # XL2Z-19C836-AC Accumulator Assy - Air Conditioning with base parts number 19C836. It is sometimes referred to as Mercury A/C Accumulator. Our Ford parts and accessories are expedited directly from authorized Ford dealers strategically located all across the U.S. and are backed by the manufacturer's 12 month, 12,000 mile warranty. OEM Ford parts are the best for restoring your vehicle to factory condition performance. This part fits specific Mercury Mountaineer models.

Affordable, reliable and built to last, Ford part # XL2Z19C836AC Accumulator Assy - Air Conditioning stands out as the smart option. FordPartsGiant.com is your prime online source with the biggest and best selection of genuine Ford parts and accessories at giant discounted prices. We have the OEM Ford parts and accessories you need at the wholesale prices. FordPartsGiant.com has you covered no matter what type of Ford vehicle you drive. For detailed Mercury parts information, click here.

Why choose Ford Parts Giant

  • Dedicated Service

    Your complete satisfaction is our #1 goal

  • Lowest Prices

    Best deals on genuine OE parts from dealerships

  • Fast Delivery

    Orders are processed and delivered promptly