Make sure this part fits

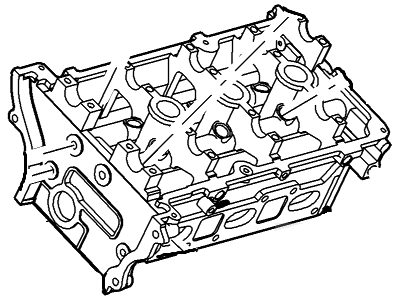
Mercury 2S7Z-6049-AA Cylinder Head Assembly

2000-2006 Mercury 2S7Z6049AA

Customer Questions & Expert Answers (5)
Ford 2S7Z-6049-AA Cylinder Head Assembly
  • Part Description
    Cylinder Head Assy
  • Base No.
    6049
  • Position
    Passenger Side
  • Replaces
    YF1Z-6049-GA
  • Manufacturer
    Ford
Make sure this part fits
$648.27 MSRP: $886.15
You Save: $237.88 (27%)
Core Charge: $150.00
Ships in 1-3 Business Days
1
ADD TO CART
  • Related Parts
  • Product Specifications
  • Vehicle Fitment
  • Customer Questions & Expert Answers
  • Product Specifications

    BrandGenuine Mercury
    Base No.6049
    Manufacturer Part Number2S7Z-6049-AA, 2S7Z6049AA
    Part DescriptionCylinder Head Assy
    Other NamesCylinder Head
    Manufacturer NoteIncludes Valves
    Item Weight30.60 Pounds
    PositionPassenger Side
    ConditionNew
    Fitment TypeDirect Replacement
    ReplacesYF1Z-6049-GA
    ManufacturerFord
    SKU2S7Z-6049-AA
    WarrantyThis genuine Ford part is guaranteed by Ford's factory warranty.
    Shipping & ReturnShipping Policy Return Policy
    Warning: California’s Proposition 65
  • Vehicle Fitment

    Year Make Model Engine Important vehicle option details
    2005-2006 Mercury Mariner6 Cyl 3.0L DOHC EFI Modular4AT CD4E, 5-Speed Manual Transmission, 5-Speed Manual Transmission - AK, Four-Wheel Drive (Full Time) (Left Hand Drive), Four-Wheel Drive (Right Hand Drive), Left Hand Drive, Two-Wheel Drive (Left Hand Drive), Two-Wheel Drive (Right Hand Drive)
    2000-2005 Mercury Sable6 Cyl 3.0L4AT 4F50N, 4AT AX4N, 4AT AX4S, 6AT
  • Customer Questions & Expert Answers

    Q:
    I am wondering if this is the exact part that fits in Posted by FordPartsGiant Specialist
    A:
    You can Select Your Vehicle to check if 2S7Z-6049-AA fits your vehicle.
    Posted by FordPartsGiant Specialist
    Q:
    What precautions should be taken when removing and installing the cylinder head on Mercury Mariner? Posted by Customer
    A:
    On 2.3L and 2.5L engines, the head bolts are torque-to-yield type and should not be reused; purchase NEW head bolts. On 2008 and earlier models, open the fuel pressure release, disconnect the battery negative terminal, take out the intake duct connected to the air filter housing, disconnect accelerator and cruise control cables if installed, drain the cooling system and remove the timing belt/chain, camshafts, temporarily install the valve cover, disconnect the camshaft position sensor, remove the complete fuel rail and injectors, take out the alternator and its mounting bracket, remove 2009 and later models need to do the following; relieve the fuel system pressure, join the negative battery terminal, lift the car properly with jackstands, drain the cooling system, remove the variable camshaft timing solenoid, remove the timing chain, put marks on the camshafts and bearing caps, remove the camshafts, remove the valve lifters and ensure that you mark them to facilitate reinstallation, remove the intake manifold, remove And starting from the last sequence with which the bolts were tightened, undo each of them by half a turn and while jacking up the cylinder head from the engine compartment be careful not to damage the aluminum alloy employed in its construction. Scrub the surfaces of mating cylinder head and block, making sure that no carbon gets into the oil and water channels and with fingers and thumb, it is advisable to run the surfaces and check for nicks or scratches on them. Clean the contacted surfaces, make sure the locating dowels are set and the cylinder head bolt holes have no contact with oil or water. Choose a new head gasket depending the number located on the front face of the cylinder block, position it appropriately, and reinstall the crankshaft pulley, but before tightening of the bolts the Number 1 cylinder must be lowered to prevent impact with the valves. Engine guide studs help in the positioning of the cylinder head, then NEW head bolts that should have a light oil on the threads are tightened progressively as indicated below. In the 2.0L engine, tighten the bolts through the angle not the torque, for 2.3L & 2.5L engines follow live tightening stage & then use angle torque method on the last two stages. It is crucial to position the crankshaft back to its TDC before embarking on the installation of other components which is simply a reverse of the removal process; the catalytic converter complete with new gaskets, camshafts and timing belt/chain should then be fitted and tightened to manufacturer recommended torque; hoses, wirings and others components need to be routed correctly; the cooling system should be refilled to the recommended level; and the vehicle should After battery connection, Powertrain Control Module has to be put again on learning mode for idle and fuel trim.
    Posted by FordPartsGiant Specialist
    Q:
    What precautions should be taken when removing and installing the cylinder head on Ford Escape? Posted by Customer
    A:
    On 2.3L and 2.5L engines, the head bolts are torque-to-yield type and should not be reused; purchase NEW head bolts. On 2008 and earlier models, open the fuel pressure release, disconnect the battery negative terminal, take out the intake duct connected to the air filter housing, disconnect accelerator and cruise control cables if installed, drain the cooling system and remove the timing belt/chain, camshafts, temporarily install the valve cover, disconnect the camshaft position sensor, remove the complete fuel rail and injectors, take out the alternator and its mounting bracket, remove 2009 and later models need to do the following; relieve the fuel system pressure, join the negative battery terminal, lift the car properly with jackstands, drain the cooling system, remove the variable camshaft timing solenoid, remove the timing chain, put marks on the camshafts and bearing caps, remove the camshafts, remove the valve lifters and ensure that you mark them to facilitate reinstallation, remove the intake manifold, remove And starting from the last sequence with which the bolts were tightened, undo each of them by half a turn and while jacking up the cylinder head from the engine compartment be careful not to damage the aluminum alloy employed in its construction. Scrub the surfaces of mating cylinder head and block, making sure that no carbon gets into the oil and water channels and with fingers and thumb, it is advisable to run the surfaces and check for nicks or scratches on them. Clean the contacted surfaces, make sure the locating dowels are set and the cylinder head bolt holes have no contact with oil or water. Choose a new head gasket depending the number located on the front face of the cylinder block, position it appropriately, and reinstall the crankshaft pulley, but before tightening of the bolts the Number 1 cylinder must be lowered to prevent impact with the valves. Engine guide studs help in the positioning of the cylinder head, then NEW head bolts that should have a light oil on the threads are tightened progressively as indicated below. In the 2.0L engine, tighten the bolts through the angle not the torque, for 2.3L & 2.5L engines follow live tightening stage & then use angle torque method on the last two stages. It is crucial to position the crankshaft back to its TDC before embarking on the installation of other components which is simply a reverse of the removal process; the catalytic converter complete with new gaskets, camshafts and timing belt/chain should then be fitted and tightened to manufacturer recommended torque; hoses, wirings and others components need to be routed correctly; the cooling system should be refilled to the recommended level; and the vehicle should After battery connection, Powertrain Control Module has to be put again on learning mode for idle and fuel trim.
    Posted by FordPartsGiant Specialist
    Q:
    What are the steps for installing the cylinder head for the 2006 Mercury Mariner? Posted by Customer
    A:
    1. Ensure the mating surfaces of the cylinder head and block are perfectly clean. 2. Check the mating surfaces for nicks, deep scratches, and other damage. 3. Use a straightedge to check for warpage of the cylinder head gasket surface. 4. Clean the mating surfaces with a clean shop towel and solvent as needed. 5. Ensure the two locating dowels are in position in the cylinder block and that all cylinder head bolt holes are free of contamination. 6. Install new cylinder head gaskets on the block, over the locating dowels. 7. Carefully install the cylinder heads, ensuring they fit properly over the locating dowels. 8. Install new cylinder head bolts and turn down by hand until snug.
    Posted by FordPartsGiant Specialist
    Q:
    How do I tighten the cylinder head bolts for the 2002 Ford Escape? Posted by Customer
    A:
    The cylinder head bolts are torque-to-yield type and must be discarded after use. Using a torque wrench and an angle gauge, tighten the cylinder head bolts in the specified sequence to the required torque. Follow the "torque angle" or "torque-to-yield" method exactly, using a breaker bar and a special torque angle adapter to tighten the bolts to the required angle.
    Posted by FordPartsGiant Specialist
    If you have any questions about this product, please don't hesitate to ask us. We will be happy to help you!

Genuine Ford Part 2S7Z-6049-AA, the Right Choice

To ensure reliability, purchase Ford part # 2S7Z-6049-AA Cylinder Head Assembly. It is sometimes referred to as Mercury Cylinder Head. In terms of quality and longevity, OEM parts are top-tier. This is because they are made according to Ford's demanding factory specifications and go through strict quality control. This part fits specific Mercury Mariner, Sable models.

FordPartsGiant.com is a leading supplier of genuine Ford parts and accessories such as Ford 2S7Z6049AA Cylinder Head Assembly. On our platform, we provide genuine Ford parts at incredible prices while ensuring top-tier quality. Feel at ease shopping with us, knowing our parts have a hassle-free return policy and rapid delivery service. For detailed Mercury parts information, click here.

Why choose Ford Parts Giant

  • Dedicated Service

    Your complete satisfaction is our #1 goal

  • Lowest Prices

    Best deals on genuine OE parts from dealerships

  • Fast Delivery

    Orders are processed and delivered promptly