Make sure this part fits

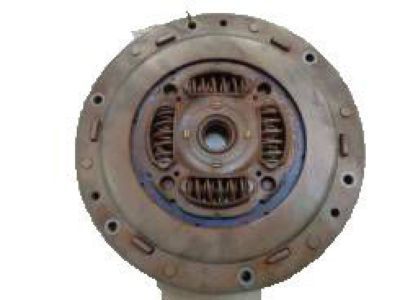
Mercury 5M6Z-7B546-AA Disc Assembly - Clutch

2005-2011 Mercury Mariner 5M6Z7B546AA

Customer Questions & Expert Answers (3)
Ford 5M6Z-7B546-AA Disc Assembly - Clutch
  • Part Description
    Disc Assy - Clutch
  • Base No.
    7L196
  • Replaced By
    5M6Z-7B546-A
  • Manufacturer
    Ford
  • Manufacturer's Notes
    This part is discontinued.
Make sure this part fits
  • Related Parts
  • Product Specifications
  • Vehicle Fitment
  • Customer Questions & Expert Answers
  • Product Specifications

    BrandGenuine Mercury
    Base No.7L196
    Manufacturer Part Number5M6Z-7B546-AA, 5M6Z7B546AA
    Part DescriptionDisc Assy - Clutch
    Item Dimensions13.7 x 13.1 x 5.3 inches
    Item Weight18.00 Pounds
    ConditionNew
    Fitment TypeDirect Replacement
    ManufacturerFord
    SKU5M6Z-7B546-AA
    WarrantyThis genuine Ford part is guaranteed by Ford's factory warranty.
    Shipping & ReturnShipping Policy Return Policy
    Warning: California’s Proposition 65
  • Vehicle Fitment

    Year Make Model Engine Important vehicle option details
    2005-2011 Mercury Mariner4 Cyl 2.3L, 4 Cyl 2.3L Hybrid Gas/Electric DOHC, 4 Cyl 2.5L Duratec (110kW/150PS), 4 Cyl 2.5L PFI Gas/Electric, 6 Cyl 3.0L DOHC EFI Modular, 6 Cyl 3.0L OHC DuratecCVT Auto Trans Powersplit Elec, Four-Wheel Drive (Full Time) (Left Hand Drive), Front-Wheel Drive (Left Hand Drive), Left Hand Drive
  • Customer Questions & Expert Answers

    Q:
    Will these fit my car and if not which part will? Thank you. Posted by FordPartsGiant Specialist
    A:
    You can Select Your Vehicle to check if 5M6Z-7B546-AA fits your vehicle.
    Posted by FordPartsGiant Specialist
    Q:
    How to remove and replace a Clutch Disc,Clutch Fork,Pressure Plate and Release Bearing in a Ford Escape? Posted by Customer
    A:
    Dust produced by clutch wear is hazardous to your health. Do not blow it out with compressed air or inhale it. Avoid using gasoline or petroleum-based solvents to remove the dust. Use brake system cleaner to flush the dust into a drain pan. After the clutch components are wiped clean with a rag, dispose of the contaminated rags and cleaner in a covered, marked container.To remove the clutch, access to its components is normally achieved by removing the transaxle, leaving the engine in the vehicle. Check the clutch for wear and replace worn components as necessary when the engine is being removed for major overhaul. However, the relatively low cost of the clutch components compared to the time and trouble spent gaining access to them warrants their replacement anytime the engine or transaxle is removed, unless they are new or in near perfect condition. Remove the transaxle from the vehicle. Support the engine while the transaxle is out, preferably using an engine support fixture or a hoist from above. The clutch fork and release bearing can remain attached to the transaxle housing for the time being. To support the clutch disc during removal, install a clutch alignment tool through the clutch disc hub.Carefully inspect the flywheel and pressure plate for indexing marks. If they cannot be found, scribe or paint marks yourself so the pressure plate and the flywheel will be in the same alignment during installation. Loosen the pressure plate-to-flywheel bolts in a criss-cross pattern until all spring pressure is relieved. Then, hold the pressure plate securely and completely remove the bolts, followed by the pressure plate and clutch disc.When inspecting clutch components, look for problems such as wear on the clutch disc. Inspect the flywheel for cracks, heat checking, grooves and other obvious defects. A machine shop can smoothen slight imperfections. Inspect the clutch disc lining and replace it if in doubt about its condition. The release bearing should also be replaced along with the clutch disc.Check the machined surfaces and the diaphragm spring fingers of the pressure plate. If damaged, replace the pressure plate. Check the pilot bearing in the end of the crankshaft for excessive wear and replace it if necessary. To remove the pilot bearing, use a slide hammer and puller attachment.To install a new pilot bearing, lightly lubricate the outside surface with grease, then drive it into the recess with a bearing driver or a socket. Clean the flywheel and pressure plate machined surfaces with brake cleaner, lacquer thinner, or acetone before installation. No oil or grease should be on these surfaces or the lining of the clutch disc.Position the clutch disc and pressure plate against the flywheel with the clutch held in place with an alignment tool. Ensure the disc is installed properly. Tighten the pressure plate-to-flywheel bolts only finger tight, working around the pressure plate. Center the clutch disc by ensuring the alignment tool extends through the splined hub and into the pilot bearing in the crankshaft. Tighten the bolts in a criss-cross pattern to prevent distorting the cover and remove the alignment tool.Lubricate the inner groove of the release bearing with high-temperature grease. Also, place a small amount of grease on the release lever contact areas and the transaxle input shaft bearing retainer. Install the clutch release bearing. Install the transaxle and all components removed previously.
    Posted by FordPartsGiant Specialist
    Q:
    How to remove and replace a Clutch Disc,Clutch Fork,Pressure Plate and Release Bearing in a Mercury Mariner? Posted by Customer
    A:
    Dust produced by clutch wear is hazardous to your health. Do not blow it out with compressed air or inhale it. Avoid using gasoline or petroleum-based solvents to remove the dust. Use brake system cleaner to flush the dust into a drain pan. After the clutch components are wiped clean with a rag, dispose of the contaminated rags and cleaner in a covered, marked container.To remove the clutch, access to its components is normally achieved by removing the transaxle, leaving the engine in the vehicle. Check the clutch for wear and replace worn components as necessary when the engine is being removed for major overhaul. However, the relatively low cost of the clutch components compared to the time and trouble spent gaining access to them warrants their replacement anytime the engine or transaxle is removed, unless they are new or in near perfect condition. Remove the transaxle from the vehicle. Support the engine while the transaxle is out, preferably using an engine support fixture or a hoist from above. The clutch fork and release bearing can remain attached to the transaxle housing for the time being. To support the clutch disc during removal, install a clutch alignment tool through the clutch disc hub.Carefully inspect the flywheel and pressure plate for indexing marks. If they cannot be found, scribe or paint marks yourself so the pressure plate and the flywheel will be in the same alignment during installation. Loosen the pressure plate-to-flywheel bolts in a criss-cross pattern until all spring pressure is relieved. Then, hold the pressure plate securely and completely remove the bolts, followed by the pressure plate and clutch disc.When inspecting clutch components, look for problems such as wear on the clutch disc. Inspect the flywheel for cracks, heat checking, grooves and other obvious defects. A machine shop can smoothen slight imperfections. Inspect the clutch disc lining and replace it if in doubt about its condition. The release bearing should also be replaced along with the clutch disc.Check the machined surfaces and the diaphragm spring fingers of the pressure plate. If damaged, replace the pressure plate. Check the pilot bearing in the end of the crankshaft for excessive wear and replace it if necessary. To remove the pilot bearing, use a slide hammer and puller attachment.To install a new pilot bearing, lightly lubricate the outside surface with grease, then drive it into the recess with a bearing driver or a socket. Clean the flywheel and pressure plate machined surfaces with brake cleaner, lacquer thinner, or acetone before installation. No oil or grease should be on these surfaces or the lining of the clutch disc.Position the clutch disc and pressure plate against the flywheel with the clutch held in place with an alignment tool. Ensure the disc is installed properly. Tighten the pressure plate-to-flywheel bolts only finger tight, working around the pressure plate. Center the clutch disc by ensuring the alignment tool extends through the splined hub and into the pilot bearing in the crankshaft. Tighten the bolts in a criss-cross pattern to prevent distorting the cover and remove the alignment tool.Lubricate the inner groove of the release bearing with high-temperature grease. Also, place a small amount of grease on the release lever contact areas and the transaxle input shaft bearing retainer. Install the clutch release bearing. Install the transaxle and all components removed previously.
    Posted by FordPartsGiant Specialist
    If you have any questions about this product, please don't hesitate to ask us. We will be happy to help you!

Genuine Ford Part 5M6Z-7B546-AA, the Right Choice

Your vehicle deserves only genuine OEM Ford parts and accessories. To ensure reliability, purchase Ford part # 5M6Z-7B546-AA Disc Assembly - Clutch with base parts number 7L196. It is sometimes referred to as Mercury Clutch Disc. Our Ford parts and accessories are expedited directly from authorized Ford dealers strategically located all across the U.S. and are backed by the manufacturer's 12 month, 12,000 mile warranty. OEM Ford parts are the best for restoring your vehicle to factory condition performance. This part fits specific Mercury Mariner models.

Affordable, reliable and built to last, Ford part # 5M6Z7B546AA Disc Assembly - Clutch stands out as the smart option. FordPartsGiant.com is your prime online source with the biggest and best selection of genuine Ford parts and accessories at giant discounted prices. We have the OEM Ford parts and accessories you need at the wholesale prices. FordPartsGiant.com has you covered no matter what type of Ford vehicle you drive. For detailed Mercury parts information, click here.

Why choose Ford Parts Giant

  • Dedicated Service

    Your complete satisfaction is our #1 goal

  • Lowest Prices

    Best deals on genuine OE parts from dealerships

  • Fast Delivery

    Orders are processed and delivered promptly