Make sure this part fits

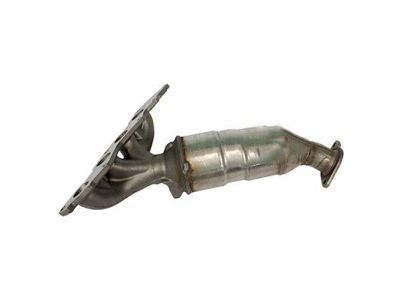
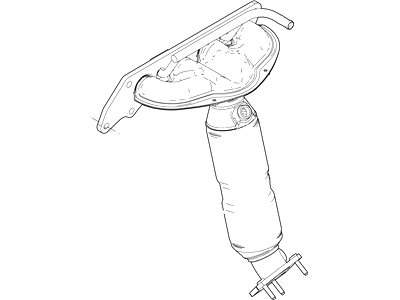
Mercury 5M6Z-5G232-A Exhaust Manifold Assembly

2006-2008 Mercury Mariner 5M6Z5G232A

Customer Questions & Expert Answers (7)
Ford 5M6Z-5G232-A Exhaust Manifold Assembly
  • Part Description
    Manifold Assembly - Exhaust
  • Replaced By
    AM6Z-5G232-A
  • Manufacturer
    Ford
Make sure this part fits
$1573.60 MSRP: $2097.01
You Save: $523.41 (25%)
Ships in 1-3 Business Days
1
ADD TO CART
  • Related Parts
  • Product Specifications
  • Vehicle Fitment
  • Customer Questions & Expert Answers
  • Product Specifications

    BrandGenuine Mercury
    Manufacturer Part Number5M6Z-5G232-A, 5M6Z5G232A
    Part DescriptionManifold Assembly - Exhaust
    Item Dimensions16.7 x 13.3 x 8.7 inches
    Item Weight20.40 Pounds
    ConditionNew
    Fitment TypeDirect Replacement
    ManufacturerFord
    SKU5M6Z-5G232-A
    WarrantyThis genuine Ford part is guaranteed by Ford's factory warranty.
    Shipping & ReturnShipping Policy Return Policy
    Warning: California’s Proposition 65
  • Vehicle Fitment

    Year Make Model Engine Important vehicle option details
    2006-2008 Mercury Mariner4 Cyl 2.3L Hybrid Gas/Electric DOHC4AT CD4E, 5-Speed Manual Transmission - AK, 6-Speed Automatic Transmission 6F Mid-Range, CVT Auto Trans Powersplit Elec, Four-Wheel Drive (Full Time) (Left Hand Drive), Front-Wheel Drive (Left Hand Drive), Left Hand Drive
  • Customer Questions & Expert Answers

    Q:
    Will these fit my car and if not which part will? Thank you. Posted by FordPartsGiant Specialist
    A:
    You can Select Your Vehicle to check if 5M6Z-5G232-A fits your vehicle.
    Posted by FordPartsGiant Specialist
    Q:
    How to remove and install the exhaust manifold in four cylinder engine on Mercury Mariner? Posted by Customer
    A:
    In the year 2008 and the models before it, start by jacking up the vehicle and putting it on the jackstands. Later, it is time to remove the exhaust pipe, as well as the catalytic converter, and, of course, the old flange gasket. Finally, remove the dipstick tube bracket bolt, pull the assembly up out of the engine compartment. Disconnect the electrical connection of the oxygen sensor and take off the device from the exhaust manifold. Subsequently, remove the exhaust manifold heat shield through the use of its bolts that should be unscrewed. Continue with the exhaust manifold bolts then the exhaust manifold and the old manifold gasket as well. Look at the exhaust manifold with special attention to any crack or damage and if there is, then it must be replaced. Wire brush clean all threads of the exhaust maniffold bolts and check for damaging , and replace those damaged ones. All gasket material has to be scraped off the mating surfaces and the surfaces have to be inspected for wear or cracks without damaging the aluminum surfaces. Check the flatness of the exhaust manifold contacting surfaces using a straightedge and a feeler gauge and if the distortion is more than that prescribed, the manifold or cylinder head should be replaced or machined. Apply anti-seize to the threads of the exhaust manifold bolts and studs, and then put on a new gasket and manifold, overtightening the fasteners in a star pattern and in increments to the suggested torque setting. The process of installation is Viv oppose to removal and after starting the engine, tap on the exhaust system for blows. For 2009 and later models when performing the following operations, use jackstands to lift the vehicle: Take off the front exhaust pipe from the exhaust manifold as well as the intermediate exhaust pipe. Remove the wiring harness from the oxygen sensor and, also, remove the exhaust manifold heat shield. Two samples of exhaust manifold mounting nuts should be removed and the ones used for the exercise must be discarded and replaced with new ones as there is no requirement for reusing them The exhaust manifold and its gasket should also be removed and the gasket must also be discarded. Bolt and nut the exhaust manifold mounting studs, check the manifold and refit it, if required, by having it machine flat. Replace the studs for the exhaust manifold and tighten the nuts on those studs as per manufactures recommended torque settings. Position a fresh gasket above the studs, fit on the manifold together with new nuts and then in a sequence-center first and then go outward-tighten nuts incrementally until you reach the outer nut and then loosen all the nuts a bit and then tighten the nuts in the same sequence again. The rest of the installation is simply the reversal of the removal procedure and do not forget to tighten the nuts holding the catalytic converter to the required torque before tightening the converter bracket bolts.
    Posted by FordPartsGiant Specialist
    Q:
    How to remove and install the exhaust manifold in four cylinder engine on Ford Escape? Posted by Customer
    A:
    In the year 2008 and the models before it, start by jacking up the vehicle and putting it on the jackstands. Later, it is time to remove the exhaust pipe, as well as the catalytic converter, and, of course, the old flange gasket. Finally, remove the dipstick tube bracket bolt, pull the assembly up out of the engine compartment. Disconnect the electrical connection of the oxygen sensor and take off the device from the exhaust manifold. Subsequently, remove the exhaust manifold heat shield through the use of its bolts that should be unscrewed. Continue with the exhaust manifold bolts then the exhaust manifold and the old manifold gasket as well. Look at the exhaust manifold with special attention to any crack or damage and if there is, then it must be replaced. Wire brush clean all threads of the exhaust maniffold bolts and check for damaging , and replace those damaged ones. All gasket material has to be scraped off the mating surfaces and the surfaces have to be inspected for wear or cracks without damaging the aluminum surfaces. Check the flatness of the exhaust manifold contacting surfaces using a straightedge and a feeler gauge and if the distortion is more than that prescribed, the manifold or cylinder head should be replaced or machined. Apply anti-seize to the threads of the exhaust manifold bolts and studs, and then put on a new gasket and manifold, overtightening the fasteners in a star pattern and in increments to the suggested torque setting. The process of installation is Viv oppose to removal and after starting the engine, tap on the exhaust system for blows. For 2009 and later models when performing the following operations, use jackstands to lift the vehicle: Take off the front exhaust pipe from the exhaust manifold as well as the intermediate exhaust pipe. Remove the wiring harness from the oxygen sensor and, also, remove the exhaust manifold heat shield. Two samples of exhaust manifold mounting nuts should be removed and the ones used for the exercise must be discarded and replaced with new ones as there is no requirement for reusing them The exhaust manifold and its gasket should also be removed and the gasket must also be discarded. Bolt and nut the exhaust manifold mounting studs, check the manifold and refit it, if required, by having it machine flat. Replace the studs for the exhaust manifold and tighten the nuts on those studs as per manufactures recommended torque settings. Position a fresh gasket above the studs, fit on the manifold together with new nuts and then in a sequence-center first and then go outward-tighten nuts incrementally until you reach the outer nut and then loosen all the nuts a bit and then tighten the nuts in the same sequence again. The rest of the installation is simply the reversal of the removal procedure and do not forget to tighten the nuts holding the catalytic converter to the required torque before tightening the converter bracket bolts.
    Posted by FordPartsGiant Specialist
    Q:
    What is a catalytic converter and what does it do for the 2006 Mercury Mariner? Posted by Customer
    A:
    A catalytic converter (or catalyst) is an emission control device in the exhaust system that reduces certain pollutants in the exhaust gas stream. There are two types of converters: an oxidation catalyst, which reduces hydrocarbons (HC) and carbon monoxide (CO), and a reduction catalyst, which reduces oxides of nitrogen (NOx). Catalysts that can reduce all three pollutants are known as "three-way catalysts." The models covered by this manual are equipped with three-way catalysts.
    Posted by FordPartsGiant Specialist
    See expert answers on similar Catalytic Converter
    Q:
    What should be done after installing the manifold for the 2008 Mercury Mariner? Posted by Customer
    A:
    The remainder of the installation is the reverse of the removal procedure.
    Posted by FordPartsGiant Specialist
    Q:
    What are the steps to check for a restricted catalytic converter using a vacuum gauge for the 2011 Ford Escape? Posted by Customer
    A:
    a) Connect a vacuum gauge to an intake manifold vacuum source. b) Warm the engine to operating temperature, place the transaxle in Park (automatic models) or Neutral (manual models), and apply the parking brake. c) Note the vacuum reading at idle and jot it down. d) Quickly open the throttle to near its wide-open position and then quickly get off the throttle and allow it to close. Note the vacuum reading and jot it down. e) Repeat this test three more times, recording your measurement after each test. f) If your fourth reading is more than one in-Hg lower than the reading noted at idle, the exhaust system might be restricted, indicating that the catalytic converter could be plugged, or an exhaust pipe or muffler could be restricted.
    Posted by FordPartsGiant Specialist
    See expert answers on similar Catalytic Converter
    Q:
    What should be removed for the right (rear) manifold for the 2003 Ford Escape? Posted by Customer
    A:
    Detach the EGR fitting nut.
    Posted by FordPartsGiant Specialist
    If you have any questions about this product, please don't hesitate to ask us. We will be happy to help you!

Genuine Ford Part 5M6Z-5G232-A, the Right Choice

To ensure reliability, purchase Ford part # 5M6Z-5G232-A Exhaust Manifold Assembly. It is sometimes referred to as Mercury Catalytic Converter, Mercury Exhaust Manifold. In terms of quality and longevity, OEM parts are top-tier. This is because they are made according to Ford's demanding factory specifications and go through strict quality control. This part fits specific Mercury Mariner models.

FordPartsGiant.com is a leading supplier of genuine Ford parts and accessories such as Ford 5M6Z5G232A Exhaust Manifold Assembly. On our platform, we provide genuine Ford parts at incredible prices while ensuring top-tier quality. Feel at ease shopping with us, knowing our parts have a hassle-free return policy and rapid delivery service. For detailed Mercury parts information, click here.

Why choose Ford Parts Giant

  • Dedicated Service

    Your complete satisfaction is our #1 goal

  • Lowest Prices

    Best deals on genuine OE parts from dealerships

  • Fast Delivery

    Orders are processed and delivered promptly