Make sure this part fits

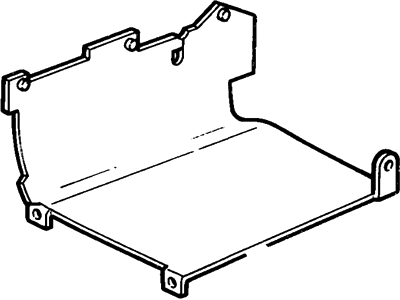
Mercury F1SZ-6675-A Pan Assembly - Engine Oil

1984-1993 Mercury F1SZ6675A

Customer Questions & Expert Answers (15)
Ford F1SZ-6675-A Pan Assembly - Engine Oil
  • Part Description
    Pan Assy - Engine Oil
  • Base No.
    6675
  • Manufacturer
    Ford
  • Manufacturer's Notes
    This part is discontinued.
Make sure this part fits
  • Related Parts
  • Product Specifications
  • Vehicle Fitment
  • Customer Questions & Expert Answers
  • Product Specifications

    BrandGenuine Mercury
    Base No.6675
    Manufacturer Part NumberF1SZ-6675-A, F1SZ6675A
    Part DescriptionPan Assy - Engine Oil
    Other NamesOil Pan
    Item Dimensions8.3 x 12.4 x 23.9 inches
    Item Weight11.60 Pounds
    ConditionNew
    Fitment TypeDirect Replacement
    ManufacturerFord
    SKUF1SZ-6675-A
    WarrantyThis genuine Ford part is guaranteed by Ford's factory warranty.
    Shipping & ReturnShipping Policy Return Policy
    Warning: California’s Proposition 65
  • Vehicle Fitment

    Year Make Model Engine Important vehicle option details
    1984-1986 Mercury Capri4 Cyl 2.3L, 6 Cyl 3.8L, 8 Cyl 5.0L3AT C3, 3AT C5, 4AT AOD, 4MT, 5MT
    1991-1993, 1984-1989 Mercury Cougar4 Cyl 2.3L, 6 Cyl 3.8L, 8 Cyl 5.0L3AT C5, 4AT AOD, 5MT
    1984-1989 Mercury Grand Marquis8 Cyl 5.0L, 8 Cyl 5.8L4AT AOD
    1984-1986 Mercury Marquis4 Cyl 2.3L, 6 Cyl 3.8L3AT C3, 3AT C5
    1986-1989 Mercury Sable4 Cyl 2.5L, 6 Cyl 3.0L, 6 Cyl 3.8L3AT ATX, 4AT AXOD
    1984-1989 Mercury Topaz4 Cyl 2.0L, 4 Cyl 2.3L3AT ATX, 4MT, 5MT
    1987-1989 Mercury Tracer4 Cyl 1.6L3AT ATX, 4AT 4EAT, 4AT F4E-III, 4AT IF4E, 4MT, 5MT
  • Customer Questions & Expert Answers

    Q:
    Is the the correct part for the attached VIN? Posted by FordPartsGiant Specialist
    A:
    You can Select Your Vehicle to check if F1SZ-6675-A fits your vehicle.
    Posted by FordPartsGiant Specialist
    Q:
    How do you remove and install the oil pan on Lincoln Mark VII Overhead valve (OHV)engines? Posted by Customer
    A:
    Disconnect the battery cable to remove the oil pan, take off the air cleaner assembly, fan shroud, dipstick for oil level, oil level sensor switch, vacuum solenoids, and exhaust crossover pipe, and disconnect the transmission cooler lines, torque converter cover, starter motor fuel lines, and steering gear bolts. Loosen transmission mount nuts, remove the front engine mount through bolts, and lift the engine slightly with a jack. Place wooden blocks between mounts and subframe; remove oil pan mounting bolts. Use a rubber mallet or wood block and hammer to separate the pan from the block. Remove the oil pump and pick up the tube fasteners.
    Posted by FordPartsGiant Specialist
    Q:
    How to remove and install the oil pan on Ford Thunderbird? Posted by Customer
    A:
    To replace the oil pan, first, disconnect the car's negative terminal, followed by the removal of the air cleaner duct assembly. Subsequently, remove wiper arms and module, and weather strip and the plastic shield on the cowl. If fitted, unbolt the crankshaft position sensor cover and, in case of supercharged variants, the intercooler pipes. Bolt an engine support fixture as close as possible to the lifting eyes by the exhaust manifolds, and then lift it and securely set on supporting jackstands. Take out the oil level dipstick and disconnect the oil level sensor from the oil pan and thereafter, drain the engine oil and finally remove the oil filter. In the case where automatic transmission is used, remove the transmission cooler lines at the radiator. There will be constant connections to most of the starter motor assembly which includes the wire harness, the ground strap as well as the steering flex coupling which should be disconnected. The through bolts at the front engine mounts and the side mount retainer strap if used should be unbolted. Place a transmission jack or floor jack under the crossmember beneath the oil pan Pull the six bolts of the back part of the crossmember and free the two bolts of the front part. Loosen and take off the nuts and bolts that joins the shock absorber to the control arm, finish detaching the nuts from the crossmember and lower it. Loosen the oil pan to bell housing and block mounting bolts and by using a large rubber mallet or a piece of wood and a hammer to carefully knock off the oil pan from the block so as not to score the sealing surface. For installation, use a gasket scraper or a putty knife scrape off the old gasket material and sealant from the pan and block, without causing scratches on the aluminium surfaces. Scrub the surfaces and the holes, and install a new rear seal, while applying RTV material to put pressure to the new seal and put a RTV around the block. Place the pan onto the block and loosely fit the bolts and make sure that gaskets have not moved and tighten the bolts to the required torque with a pattern of tightening with the center bolt first. The rest of the steps are the opposite of the removal process and do not forget to add oil into the engine before the starting of the engine. Inspection after starting the engine should be done to check for oil leaks round the oil pan it and after driving the vehicle check again.
    Posted by FordPartsGiant Specialist
    Q:
    How do you remove and install the oil pan on Lincoln Continental Overhead cam(OHC) engine? Posted by Customer
    A:
    Disconnect the battery cable and drain the oil after removing the filter, to remove the oil pan. Remove the exhaust pipe and fan shroud as well as the starter motor. All nuts should be loosened and brackets through bolts removed. Raise the engine using a jack, remove pan bolts, and maneuver the pan out. You can clean components, inspect for wear, replace O-ring as necessary, place gasket on pan and pick-up tube then reinstall them. Further, bolts should be tightened up; surfaces cleaned and secure fastening ensured. Fill with oil, start the engine, and check for leaks.
    Posted by FordPartsGiant Specialist
    Q:
    How to remove and install oil pans in four cylinder engine on Mercury Capri? Posted by Customer
    A:
    Some of the models from 1986 to 1990 utilizing the aluminum oil pan will require a one-piece gasket while other models will require a four-piece gasket. Start by aligning the number one piston at the Top Dead Center, to do this is also align the number four piston so as to allow for oil pan removal. Remove the negative battery terminal, safely lift the car on jack stands and drain the coolant, oil, and also remove the oil filter. Remove low oil level sensor if fixed on the oil pan and go ahead and remove the engine mounts to facilitate engine lifiting. Place a piece of wood beneath the oil pan to protect it when lifting the engine Then also take the steering gear and the chassis stiffening brace off. Remove the bolts of the sway bar and the starter motor and the bolts of the oil pan and reinforcements. Remove the gasket seal and separate the pan, all the previous gasket material on the surface should be scraped off and the surface cleaned. For installation bolt the oil pan gasket into place by using adhesive if it is one piece gasket or the sealer if it is a four-piece gasket and then the oil pump and pick-up tube if they have been removed. They are guide pins since they help in aligning the oil pan then you are supposed to install the oil pan, bolts and tighten them in a clockwise fashion. For those manufactured from 1991 you should first, remove the battery black terminal, the air intake outlet leading to the cylinder, shed off the engine oil, and ignite the jack. Take out the starter, unbolt the exhaust manifold, and unbolt/OEM clip the engine mounts. Lift up the engine and pull of the oil pan to transmission bolts; then the transmission; followed by the flywheel and oil cooler lines less the dipstick tube. Remove the gasket seal and disconnect the oil pan: rtv and wipe all the external and internal part. Clean and coat the block with silicone gasket and sealant, fit the oil pan gasket, and fit the oil pump drive and pick-up tube assembly. Replace bolt and pan along with the gaskets and tighten it, then fit the fly wheel along with the transmission. Last but not least, lower the engine, fix the engine mounts, tighten all bolts as per the torque setting, and replace the oil filter and the oil, and, then start the engine to look for the leaks.
    Posted by FordPartsGiant Specialist
    Q:
    How do you remove and install the oil pan on Lincoln Continental Overhead valve (OHV)engines? Posted by Customer
    A:
    Disconnect the battery cable to remove the oil pan, take off the air cleaner assembly, fan shroud, dipstick for oil level, oil level sensor switch, vacuum solenoids, and exhaust crossover pipe, and disconnect the transmission cooler lines, torque converter cover, starter motor fuel lines, and steering gear bolts. Loosen transmission mount nuts, remove the front engine mount through bolts, and lift the engine slightly with a jack. Place wooden blocks between mounts and subframe; remove oil pan mounting bolts. Use a rubber mallet or wood block and hammer to separate the pan from the block. Remove the oil pump and pick up the tube fasteners.
    Posted by FordPartsGiant Specialist
    Q:
    How to remove and install the oil pan on Mercury Cougar? Posted by Customer
    A:
    To replace the oil pan, first, disconnect the car's negative terminal, followed by the removal of the air cleaner duct assembly. Subsequently, remove wiper arms and module, and weather strip and the plastic shield on the cowl. If fitted, unbolt the crankshaft position sensor cover and, in case of supercharged variants, the intercooler pipes. Bolt an engine support fixture as close as possible to the lifting eyes by the exhaust manifolds, and then lift it and securely set on supporting jackstands. Take out the oil level dipstick and disconnect the oil level sensor from the oil pan and thereafter, drain the engine oil and finally remove the oil filter. In the case where automatic transmission is used, remove the transmission cooler lines at the radiator. There will be constant connections to most of the starter motor assembly which includes the wire harness, the ground strap as well as the steering flex coupling which should be disconnected. The through bolts at the front engine mounts and the side mount retainer strap if used should be unbolted. Place a transmission jack or floor jack under the crossmember beneath the oil pan Pull the six bolts of the back part of the crossmember and free the two bolts of the front part. Loosen and take off the nuts and bolts that joins the shock absorber to the control arm, finish detaching the nuts from the crossmember and lower it. Loosen the oil pan to bell housing and block mounting bolts and by using a large rubber mallet or a piece of wood and a hammer to carefully knock off the oil pan from the block so as not to score the sealing surface. For installation, use a gasket scraper or a putty knife scrape off the old gasket material and sealant from the pan and block, without causing scratches on the aluminium surfaces. Scrub the surfaces and the holes, and install a new rear seal, while applying RTV material to put pressure to the new seal and put a RTV around the block. Place the pan onto the block and loosely fit the bolts and make sure that gaskets have not moved and tighten the bolts to the required torque with a pattern of tightening with the center bolt first. The rest of the steps are the opposite of the removal process and do not forget to add oil into the engine before the starting of the engine. Inspection after starting the engine should be done to check for oil leaks round the oil pan it and after driving the vehicle check again.
    Posted by FordPartsGiant Specialist
    Q:
    What should be done to ensure a proper installation for the 1988 Lincoln Mark VII? Posted by Customer
    A:
    Complete the installation steps in reverse, ensuring all traces of old gasket material are removed, the mating surfaces are clean, and the oil pan is securely fastened.
    Posted by FordPartsGiant Specialist
    See expert answers on similar Oil Pan
    Q:
    What steps should be followed to complete the process for the 1993 Lincoln Town Car? Posted by Customer
    A:
    Complete the remaining steps in reverse, start the engine, and check for oil leaks.
    Posted by FordPartsGiant Specialist
    See expert answers on similar Oil Pan
    Q:
    How should the mating surfaces be cleaned for the 1993 Mercury Capri? Posted by Customer
    A:
    Clean the mating surfaces with lacquer thinner or acetone and ensure the bolt holes in the block are clean.
    Posted by FordPartsGiant Specialist
    Q:
    What should be done with the reinforcement brackets and transmission mount for the 1997 Lincoln Town Car? Posted by Customer
    A:
    Remove the reinforcement brackets on both sides of the engine block and loosen the nuts holding the transmission mount to the crossmember.
    Posted by FordPartsGiant Specialist
    See expert answers on similar Oil Pan
    Q:
    What should be done with the steering flex coupling and steering gear for the 2004 Mercury Grand Marquis? Posted by Customer
    A:
    Disconnect the steering flex coupling and remove the two bolts attaching the steering gear to the subframe. Let the steering gear rest on the subframe away from the oil pan.
    Posted by FordPartsGiant Specialist
    Q:
    What should be used to clean the mating surfaces for the 1991 Mercury Capri? Posted by Customer
    A:
    Clean the mating surfaces with lacquer thinner or acetone. Make sure the block and front cover bolt holes are clean.
    Posted by FordPartsGiant Specialist
    Q:
    What should be done with all mating surfaces and seal grooves for the 1982 Mercury Capri? Posted by Customer
    A:
    Clean all mating surfaces and seal grooves.
    Posted by FordPartsGiant Specialist
    Q:
    How should the transmission mount be handled for the 2001 Mercury Grand Marquis? Posted by Customer
    A:
    Loosen the nuts holding the transmission mount to the crossmember, but don't remove them completely. This will allow the engine/transmission assembly to be moved up, providing clearance for oil pan removal.
    Posted by FordPartsGiant Specialist
    See expert answers on similar Oil Pan
    If you have any questions about this product, please don't hesitate to ask us. We will be happy to help you!

Genuine Ford Part F1SZ-6675-A, the Right Choice

To ensure reliability, purchase Ford part # F1SZ-6675-A Pan Assembly - Engine Oil. It is sometimes referred to as Mercury Oil Pan. In terms of quality and longevity, OEM parts are top-tier. This is because they are made according to Ford's demanding factory specifications and go through strict quality control. This part fits specific Mercury Capri, Cougar, Tracer models.

FordPartsGiant.com is a leading supplier of genuine Ford parts and accessories such as Ford F1SZ6675A Pan Assembly - Engine Oil. On our platform, we provide genuine Ford parts at incredible prices while ensuring top-tier quality. Feel at ease shopping with us, knowing our parts have a hassle-free return policy and rapid delivery service. For detailed Mercury parts information, click here.

Why choose Ford Parts Giant

  • Dedicated Service

    Your complete satisfaction is our #1 goal

  • Lowest Prices

    Best deals on genuine OE parts from dealerships

  • Fast Delivery

    Orders are processed and delivered promptly