Make sure this part fits

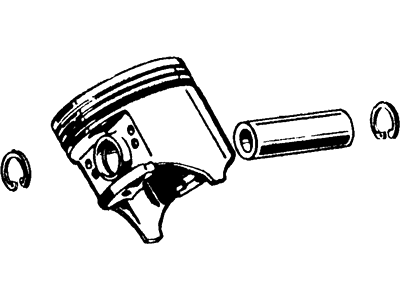
Ford E6TZ-6108-FB Piston

1980-1986 Ford E6TZ6108FB

Customer Questions & Expert Answers (19)
Ford E6TZ-6108-FB Piston
  • Part Description
    Piston
  • Manufacturer
    Ford
  • Manufacturer's Notes
    This part is discontinued.
Make sure this part fits
  • Product Specifications
  • Vehicle Fitment
  • Customer Questions & Expert Answers
  • Product Specifications

    BrandGenuine Ford
    Manufacturer Part NumberE6TZ-6108-FB, E6TZ6108FB
    Part DescriptionPiston
    Item Weight2.20 Pounds
    ConditionNew
    Fitment TypeDirect Replacement
    ManufacturerFord
    SKUE6TZ-6108-FB
    WarrantyThis genuine Ford part is guaranteed by Ford's factory warranty.
    Shipping & ReturnShipping Policy Return Policy
    Warning: California’s Proposition 65
  • Vehicle Fitment

    Year Make Model Engine Important vehicle option details
    1986 Ford Aerostar4 Cyl 2.3L, 6 Cyl 3.0L4AT A4LD, 5MT
    1980-1986 Ford Bronco6 Cyl 4.9L, 8 Cyl 5.0L, 8 Cyl 5.8L3AT C6, 4AT AOD, 4MT
    1985-1986 Ford Bronco II4 Cyl 2.3L4AT A4LD, 4MT, 5MT
    1980-1986 Ford E-1506 Cyl 4.9L, 8 Cyl 5.0L, 8 Cyl 5.8L, 8 Cyl 6.9L Diesel, 8 Cyl 7.5L3AT C6, 3MT, 4AT AOD, 4MT
    1980-1986 Ford E-2506 Cyl 4.9L, 8 Cyl 5.0L, 8 Cyl 5.8L, 8 Cyl 6.6L, 8 Cyl 6.9L Diesel, 8 Cyl 7.5L3AT C6, 3MT, 4AT AOD
    1980-1986 Ford E-350/E-350 Super Duty6 Cyl 4.9L, 8 Cyl 5.0L, 8 Cyl 5.8L, 8 Cyl 6.6L, 8 Cyl 6.9L Diesel, 8 Cyl 7.5L3AT C6, 3MT, 4AT E4OD, 4MT
    1980-1986 Ford F-1506 Cyl 3.8L, 6 Cyl 4.9L, 8 Cyl 5.0L, 8 Cyl 5.8L, 8 Cyl 6.9L3AT C5, 3AT C6, 3MT, 4AT AOD, 4MT
    1980-1986 Ford F-2506 Cyl 4.9L, 8 Cyl 5.0L, 8 Cyl 5.8L, 8 Cyl 6.6L, 8 Cyl 6.9L, 8 Cyl 7.5L3AT C6, 3MT, 4AT AOD, 4MT
    1980-1986 Ford F-3506 Cyl 4.9L, 8 Cyl 5.0L, 8 Cyl 5.8L, 8 Cyl 6.6L, 8 Cyl 6.9L, 8 Cyl 7.5L3AT C6, 4MT
    1980 Ford Granada6 Cyl 4.1L, 8 Cyl 4.2L, 8 Cyl 5.0L3AT C4, 4MT
    View More
  • Customer Questions & Expert Answers

    Q:
    I would like to know is this part gonna fit with my car Posted by FordPartsGiant Specialist
    A:
    You can Select Your Vehicle to check if E6TZ-6108-FB fits your vehicle.
    Posted by FordPartsGiant Specialist
    Q:
    How to properly install piston/connecting rod assemblies on Ford F-250? Posted by Customer
    A:
    Careful should be taken to see that the cylinder walls are free from rust and the top edge of each cylinder are deburred while fixing the piston and the connecting rod, crank shaft must be fixed. Pry the connecting rod cap off, on the number one connecting rod withdraw the old bearing inserts and clean the bearing surfaces thoroughly using a clean, lint-free cloth. Before final assembly, it is advisable to clean the back side of the new upper bearing half and put it in place in the connecting rod such that the tang will slide into the correct slot without having to hammer it or damage the bearing face in the process. Clean the back side of the other bearing insert and put it into the rod cap such that the tang rests on the slot but you do not apply any lubrication. Place the gaps of the piston ring around the piston and slide a part of a plastic or rubber hose over one of the connecting rod cap bolts. Apply clean engine oil on the piston and rings, fit on the piston ring compressor; keep a 1/4-inch lip on skirt to ease the piston into the cylinder. Turn the crankshaft anticlockwise until the number one connecting rod journal coincides with bdc and lubricate the cylinder walls with engine oil. With the notch on top of the piston facing the front of the engine, gently position the piston/connecting rod assembly into number one cylinder bore so that the bottom edge of the ring compressor lays on the engine block, tap the top edge of the ring compressor. Gently strike the top of the piston lightly with a wooden or plastic hammer handle and at the same time, still holding the ring compressor down, smooth the connecting rod over the crankshaft journal and align the piston boss with the next corresponding hole in the cylinder liner. After the assembly has been installed than check the oil clearance of the connecting rod bearing before final tightening of the rod cap. Take a strip of Plastigage somewhat shorter than the bearing width of the connecting rod and place it on the number one connecting rod journal, next, clean the connecting rod cap bearing face, and remove the protective hoses before fitting the rod cap in a manner that the marked faces align. Ensure to tighten nuts to the required torque in three stages without causing rotation of the crankshaft. Take off the rod cap gently, because the movement of Plastigage may be affected, compare the width of the squashed Plastigage with that marked on the container to get the oil clearance, and check the required value. Incase the clearance is incorrect, feel for dirt or oil lying between the bearing insert and the connecting rod or any cap on it, also measure the journal diameter again. Remove any Plastigage from the rod journal and part of the bearing face gently without causing any scratch and then apply a thin film of new moly-base grease or fresh engine assembly lube on both the surfaces. Simply slide the connecting rod back into the position on the journal, detach the protective hoses, screw the rod cap back into position and finally tighten the nuts to the torque; but just like in the initial tightening of the nuts, gradually increase the torque in sequences of three. Perform the same for rest of the piston-connecting rod assembly, holding the bearing inserts and connecting rods clean, make sure to fit right piston at each cylinder with the notch in front of the engine and lubricate the piston well and then fit the ring compressor correctly over it. After all assemblies are installed, take the crankshaft and try to rotate it by hand to check for excessive binding; finally, check the con rod end float by feeling the movement at the big end, the measured endfloat should be correct; if new con rods or a new crankshaft was assembled to the engine, the endfloat may require adjustment, by taking the rods to an automotive machine shop for reboring.
    Posted by FordPartsGiant Specialist
    Q:
    How to install piston/connecting rod assemblies on Lincoln Continental? Posted by Customer
    A:
    Before installing piston/connecting rod assemblies, ensure clean cylinder walls, chamfered top edge of each cylinder, and crankshaft in place. Remove cap from end of number one connecting rod, wipe original bearing inserts' surfaces. Place upper and lower bearing inserts in connecting rod and cap, align tabs. Position piston ring gaps, lubricate piston and rings with oil. Use ring compressor to insert assembly into number one cylinder bore, tap piston into place, guide connecting rod onto crankshaft journal. Check connecting rod bearing oil clearance with Plastigage before bolting rod cap. Tighten nuts to specified torque, check Plastigage for oil clearance, scrape off traces if correct. Apply moly-base grease or assembly lube to bearing faces, slide connecting rod back into place. Repeat procedure for remaining pistons/connecting rods. Rotate crankshaft to check for binding, verify connecting rod endplay, resize rods if necessary at machine shop.
    Posted by FordPartsGiant Specialist
    Q:
    How to prepare for piston/connecting rod assembly removal on Lincoln Continental? Posted by Customer
    A:
    To prepare for piston/connecting rod assembly removal, check for ridges at the upper limit of ring travel using your fingernail and, if present, use a ridge reamer to eliminate them before attempting to remove the piston/connecting rod assemblies. Ensure the tool doesn't cut into the ring travel area more than 1/32-inch. Once ridges are addressed, turn the engine upside-down with the crankshaft facing up. Before removing connecting rods, check the side clearance with a dial indicator or feeler gauges, ensuring it falls within the specified limits; excessive clearance may require new connecting rods or crankshaft repair. Mark connecting rods and caps for identification, then gradually loosen the connecting rod cap nuts or bolts and remove them by hand. Remove the connecting rod cap and bearing insert, protecting the crankshaft with hose sections if studs are present. Push the connecting rod/piston assembly out through the top of the engine using a wooden or plastic hammer handle, ensuring any resistance is double-checked for ridge removal. Repeat for remaining cylinders. After removal, reassemble connecting rod caps and bearing inserts in their respective rods, securing cap nuts finger tight, and avoid separating pistons from connecting rods.
    Posted by FordPartsGiant Specialist
    Q:
    How to prepare for piston/connecting rod assembly removal on Lincoln Mark VII? Posted by Customer
    A:
    To prepare for piston/connecting rod assembly removal, check for ridges at the upper limit of ring travel using your fingernail and, if present, use a ridge reamer to eliminate them before attempting to remove the piston/connecting rod assemblies. Ensure the tool doesn't cut into the ring travel area more than 1/32-inch. Once ridges are addressed, turn the engine upside-down with the crankshaft facing up. Before removing connecting rods, check the side clearance with a dial indicator or feeler gauges, ensuring it falls within the specified limits; excessive clearance may require new connecting rods or crankshaft repair. Mark connecting rods and caps for identification, then gradually loosen the connecting rod cap nuts or bolts and remove them by hand. Remove the connecting rod cap and bearing insert, protecting the crankshaft with hose sections if studs are present. Push the connecting rod/piston assembly out through the top of the engine using a wooden or plastic hammer handle, ensuring any resistance is double-checked for ridge removal. Repeat for remaining cylinders. After removal, reassemble connecting rod caps and bearing inserts in their respective rods, securing cap nuts finger tight, and avoid separating pistons from connecting rods.
    Posted by FordPartsGiant Specialist
    Q:
    How to remove the piston and connecting rod assemblies on Mercury Capri? Posted by Customer
    A:
    Prior to removing the piston and connecting rod assemblies, the cylinder head(s), oil pan, and oil pump (except for 3.8L V6 models) must be removed. Use your fingernail to check for any ridge at the upper limit of ring travel, approximately 1/4-inch down from the top of each cylinder; if ridges are present due to carbon deposits or cylinder wear, they must be completely removed with a special tool, following the manufacturer's instructions, as failure to do so may result in piston breakage. After removing the cylinder ridges, turn the engine upside-down with the crankshaft facing up. Before removing the connecting rods, check the endplay with feeler gauges, ensuring that the play is removed between the first connecting rod and the crankshaft throw; if the endplay exceeds the service limit, new connecting rods will be necessary, and if new rods or a new crankshaft are installed, the endplay may need to be adjusted. Check the connecting rods and caps for identification marks, and if they are not marked, use a small center-punch to create indentations. Loosen each connecting rod cap nut by 1/2-turn until they can be removed by hand, then take off the number one connecting rod cap and bearing insert without dropping the bearing insert. To protect the crankshaft journal and cylinder wall during piston removal, slip a short length of plastic or rubber hose over each connecting rod cap bolt. Remove the bearing insert and push the connecting rod/piston assembly out through the top of the engine, using a wooden hammer handle to apply pressure on the upper bearing surface; if resistance is encountered, ensure that all ridges have been removed from the cylinder. Repeat this process for the remaining cylinders. After removal, reassemble the connecting rod caps and bearing inserts in their respective connecting rods and install the cap nuts finger tight, leaving the old bearing inserts in place until reassembly to prevent accidental damage to the connecting rod bearing surfaces. Avoid separating the pistons from the connecting rods.
    Posted by FordPartsGiant Specialist
    Q:
    How to remove the piston/connecting rod assemblies on Ford Bronco? Posted by Customer
    A:
    Before full disassembly of the piston and connecting rod assemblies there are few components that need to be detached,the cylinder head, the oil pan and the oil pump. First, eliminate the ridge at the top of each cylinder utilizing a ridge reaming tool because the existence of this ridge is dangerous to the pistons when undertaking the removal processes. After clearing the ridges, inversion of the engine is done with crank shaft upwards. When disconnecting the connecting rods, it will be necessary to check the end play with feeler gages; it should readily be possible to insert the thickness of a feeler gage between the first connecting rod and the crankshaft throw; if the end play is excessive, it may be necessary to replace the connecting rods. Locate the connecting rods and the caps with the marks; in case the latter ones are missing, the engineer shall apply a center punch to put an indentation of the cylinders' number. Turn the connecting rod cap nuts gradually to be unfastened by hand; then take off the first connecting rod cap and the bearing insert without dropping the latter. For each of the connecting rod cap bolts to be removed, slip in a short length of plastic or rubber hose over the bolt before gently pounding the connecting rod/piston assembly out through the top of the engine, using a wooden or plastic hammer handle only. In case of resistance make sure that all the ridge material has been cleared. Perform it for the rest of the cylinders and once they are removed, fit back the connecting rod caps and bearing inserts to their corresponding rods and tighten the cap nuts only with fingers to avoid the wear and tear of the bearing surfaces.
    Posted by FordPartsGiant Specialist
    Q:
    What are the signs of scoring and scuffing on the piston skirt for the 1981 Ford F-250? Posted by Customer
    A:
    Look for scoring and scuffing on the thrust faces of the skirt, holes in the piston crown, and burned areas at the edge of the crown. These signs may indicate overheating, abnormal combustion, or spark knock (detonation). The cooling and lubrication systems should be checked thoroughly.
    Posted by FordPartsGiant Specialist
    Q:
    What should you check for on the connecting rods and caps before removal for the 1986 Ford F-250? Posted by Customer
    A:
    Check the connecting rods and caps for identification marks. If they aren't plainly marked, use a small center-punch to make the appropriate number of indentations on each rod and cap (1, 2, 3, etc., depending on the cylinder they are associated with).
    Posted by FordPartsGiant Specialist
    Q:
    How can carbon deposits be removed from the piston tops for the 1982 Lincoln Continental? Posted by Customer
    A:
    Scrape carbon deposits from the piston tops using a hand-held wire brush or fine emery cloth, avoiding the use of a drill-mounted wire brush to prevent erosion of the soft piston material.
    Posted by FordPartsGiant Specialist
    See expert answers on similar Piston
    Q:
    What should be done to verify the correctness of the connecting rod endplay for the 1984 Lincoln Mark VII? Posted by Customer
    A:
    Rotate the crankshaft to check for binding - Compare the measurement of the connecting rod endplay to specifications - If necessary, resize the rods at an automotive machine shop.
    Posted by FordPartsGiant Specialist
    See expert answers on similar Piston
    Q:
    What should be done after all piston/connecting rod assemblies are installed for the 1980 Mercury Capri? Posted by Customer
    A:
    Rotate the crankshaft a number of times by hand to check for any obvious binding.
    Posted by FordPartsGiant Specialist
    Q:
    How should you remove the connecting rod cap and bearing insert for the 1994 Lincoln Town Car? Posted by Customer
    A:
    You should gradually loosen the connecting rod cap nuts or bolts and remove them by hand.
    Posted by FordPartsGiant Specialist
    See expert answers on similar Piston
    Q:
    How should the piston rings be extracted for the 1985 Lincoln Mark VII? Posted by Customer
    A:
    Use a piston ring installation tool to carefully extract the rings, avoiding any damage to the pistons.
    Posted by FordPartsGiant Specialist
    See expert answers on similar Piston
    Q:
    What should be done if piston removal from connecting rods is required for the 1993 Lincoln Town Car? Posted by Customer
    A:
    Consult an automotive machine shop for assistance with piston removal from connecting rods.
    Posted by FordPartsGiant Specialist
    See expert answers on similar Piston
    Q:
    What should be done to verify the correctness of the connecting rod endplay for the 1984 Lincoln Town Car? Posted by Customer
    A:
    Rotate the crankshaft to check for binding - Compare the measurement of the connecting rod endplay to specifications - If necessary, resize the rods at an automotive machine shop.
    Posted by FordPartsGiant Specialist
    See expert answers on similar Piston
    Q:
    How should the piston rings be removed from the pistons for the 1992 Mercury Capri? Posted by Customer
    A:
    Using a piston ring installation tool, carefully remove the rings from the pistons. Be careful not to nick or gouge the pistons in the process.
    Posted by FordPartsGiant Specialist
    Q:
    What should be inspected on each piston for the 1986 Ford Bronco? Posted by Customer
    A:
    Carefully inspect each piston for cracks around the skirt, at the pin bosses, and at the ring lands.
    Posted by FordPartsGiant Specialist
    Q:
    What must be done before installing the piston/connecting rod assemblies for the 1991 Ford Bronco? Posted by Customer
    A:
    The cylinder walls must be perfectly clean, the top edge of each cylinder must be chamfered (to remove the sharp edge), and the crankshaft must be in place.
    Posted by FordPartsGiant Specialist
    If you have any questions about this product, please don't hesitate to ask us. We will be happy to help you!

Genuine Ford Part E6TZ-6108-FB, the Right Choice

To ensure reliability, purchase Ford part # E6TZ-6108-FB Piston. It is sometimes referred to as Ford Piston. In terms of quality and longevity, OEM parts are top-tier. This is because they are made according to Ford's demanding factory specifications and go through strict quality control. This part fits specific Ford Bronco, F-150, Ranger models. It fits Lincoln Continental, Mark VI, Versailles. It also fits Mercury Capri, Cougar, Monarch.

FordPartsGiant.com is a leading supplier of genuine Ford parts and accessories such as Ford E6TZ6108FB Piston. On our platform, we provide genuine Ford parts at incredible prices while ensuring top-tier quality. Feel at ease shopping with us, knowing our parts have a hassle-free return policy and rapid delivery service. For detailed Ford parts information, click here.

Why choose Ford Parts Giant

  • Dedicated Service

    Your complete satisfaction is our #1 goal

  • Lowest Prices

    Best deals on genuine OE parts from dealerships

  • Fast Delivery

    Orders are processed and delivered promptly